How to create a simple survey app with React using Next.js and Sanity
Adding a survey form to a website allows you to get feedback from users, customers, employees or potential customers. You can use online survey creators such as Google Forms or Microsoft Forms. Another option is to create your own, which allows you to customize it however you want to and you'll have more control over the data.
In this tutorial, we'll learn how to create a React survey app using Next.js and Sanity. Next.js will be used to create the front end survey form and send the survey responses to Sanity. Sanity, which is a CMS (content management system) platform, will store the survey submissions and we'll be able to view the submissions in Sanity as well. This tutorial assumes that you know the basics of React. It doesn't matter if you haven't used Next.js or Sanity before.
You can find the code for the final React survey app in our GitHub repository.
Why use Next.js?
We'll use Next.js, which is popular React framework that has many useful built-in features for building production-ready websites. The feature that's important for our survey app is the API routes that provide back end functionality. We'll create an API route that will use a serverless function to send survey data to our Sanity CMS.
Our serverless function will run on the backend in Node.js. This will allow us to securely use the Sanity access token, which should be kept secret, that we'll need to send API requests to Sanity.
Why use Sanity?
Sanity is a CMS platform for structured content. The structure is provided by a schema that you create to describe your data content. Sanity Studio creates a UI from the schema that will allow you to easily create content. Sanity Studio is an open-source, easy to use, and highly customizable CMS built with React that's used to manage content on the Sanity platform.
We won't use Sanity Studio to create content, we'll use it to view survey submissions. Sanity Studio is a highly customizable React app, we'll modify it to have a custom preview of our survey responses. The Sanity Studio UI updates in real-time without needing to refresh the browser so you'll be able to see survey results as they come in.
Getting started - cloning the starter repository
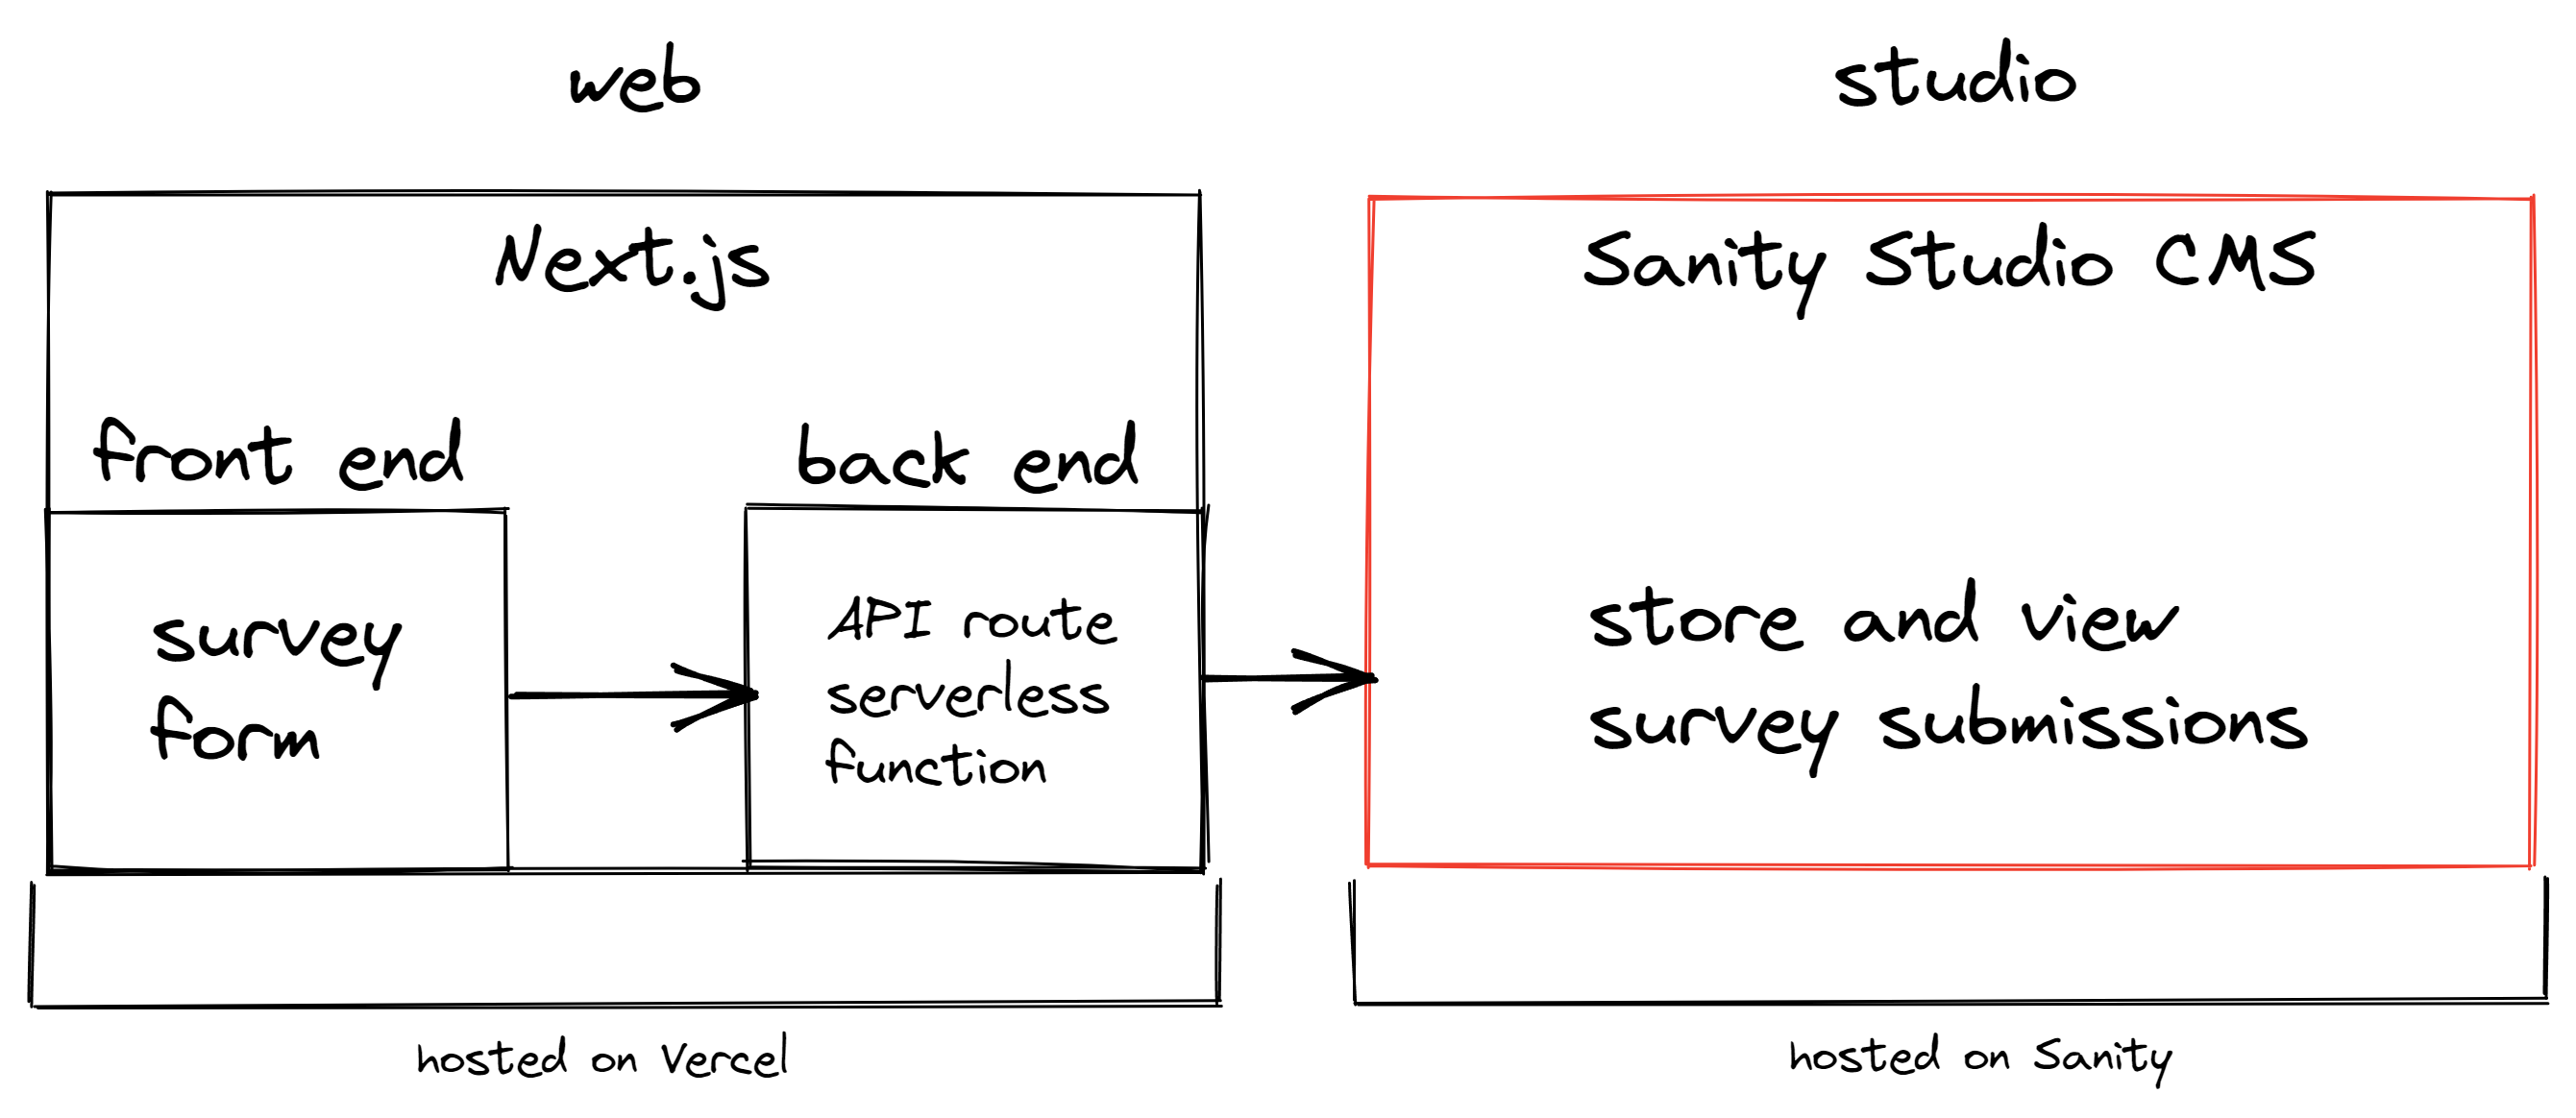
We'll start this project by cloning the following starter GitHub repository. This repository consists of two folders: web and studio. The web folder is for our Next.js app. We'll deploy it to Vercel, which is the company that created Next.js. The studio folder is for our Sanity Studio CMS code. We'll deploy it to Sanity.
If you don't want to use Sanity CMS, you can swap it out for any other CMS or you can add the submissions to a database and view the submissions there. You can also choose to host your Sanity app anywhere else as the Sanity Studio build code consists of only static HTML, CSS, and JavaScript files. This will require more configuration than hosting on Sanity, to find out more you can check the Sanity docs.
You can also host the Next.js app elsewhere if the hosting provider supports Node.js. This will not be as quick as deploying on Vercel. To find out more you can check the Vercel docs.
VS Code settings, linting and code formatting
Both the web and studio folders have a .vscode folder for some VS Code settings and extension recommendations. The title bar will be black for the web folder and orange for the studio folder so that the two can be easily distinguished if both are open in separate VS Code windows. There are also settings for ESLint and Prettier. If you don't use VS Code as an IDE, you can delete this file. ESLint and Prettier were added for code quality. ESLint is a linter, which means it helps find and fix errors in your JavaScript code. Prettier is used for code formatting. These have been configured to format your code on paste and on save in the .vscode folder. If you don't use VS Code, you'll need to configure this for your IDE.
Requirements
Before starting, make sure that you have Node version 12.22.0 or greater installed on your operating system. You'll also need Yarn package manager installed, you can see how to install it in the Yarn docs. All of the yarn packages that we'll use have been added to the starter repository package.json files.
Now let's start with creating the front end of our survey app.
Getting started with the Next.js survey form
Change the current directory to the web folder and install the dependencies:
cd web
yarn install
Now run the development server:
yarn dev
You'll see the following in your browser:
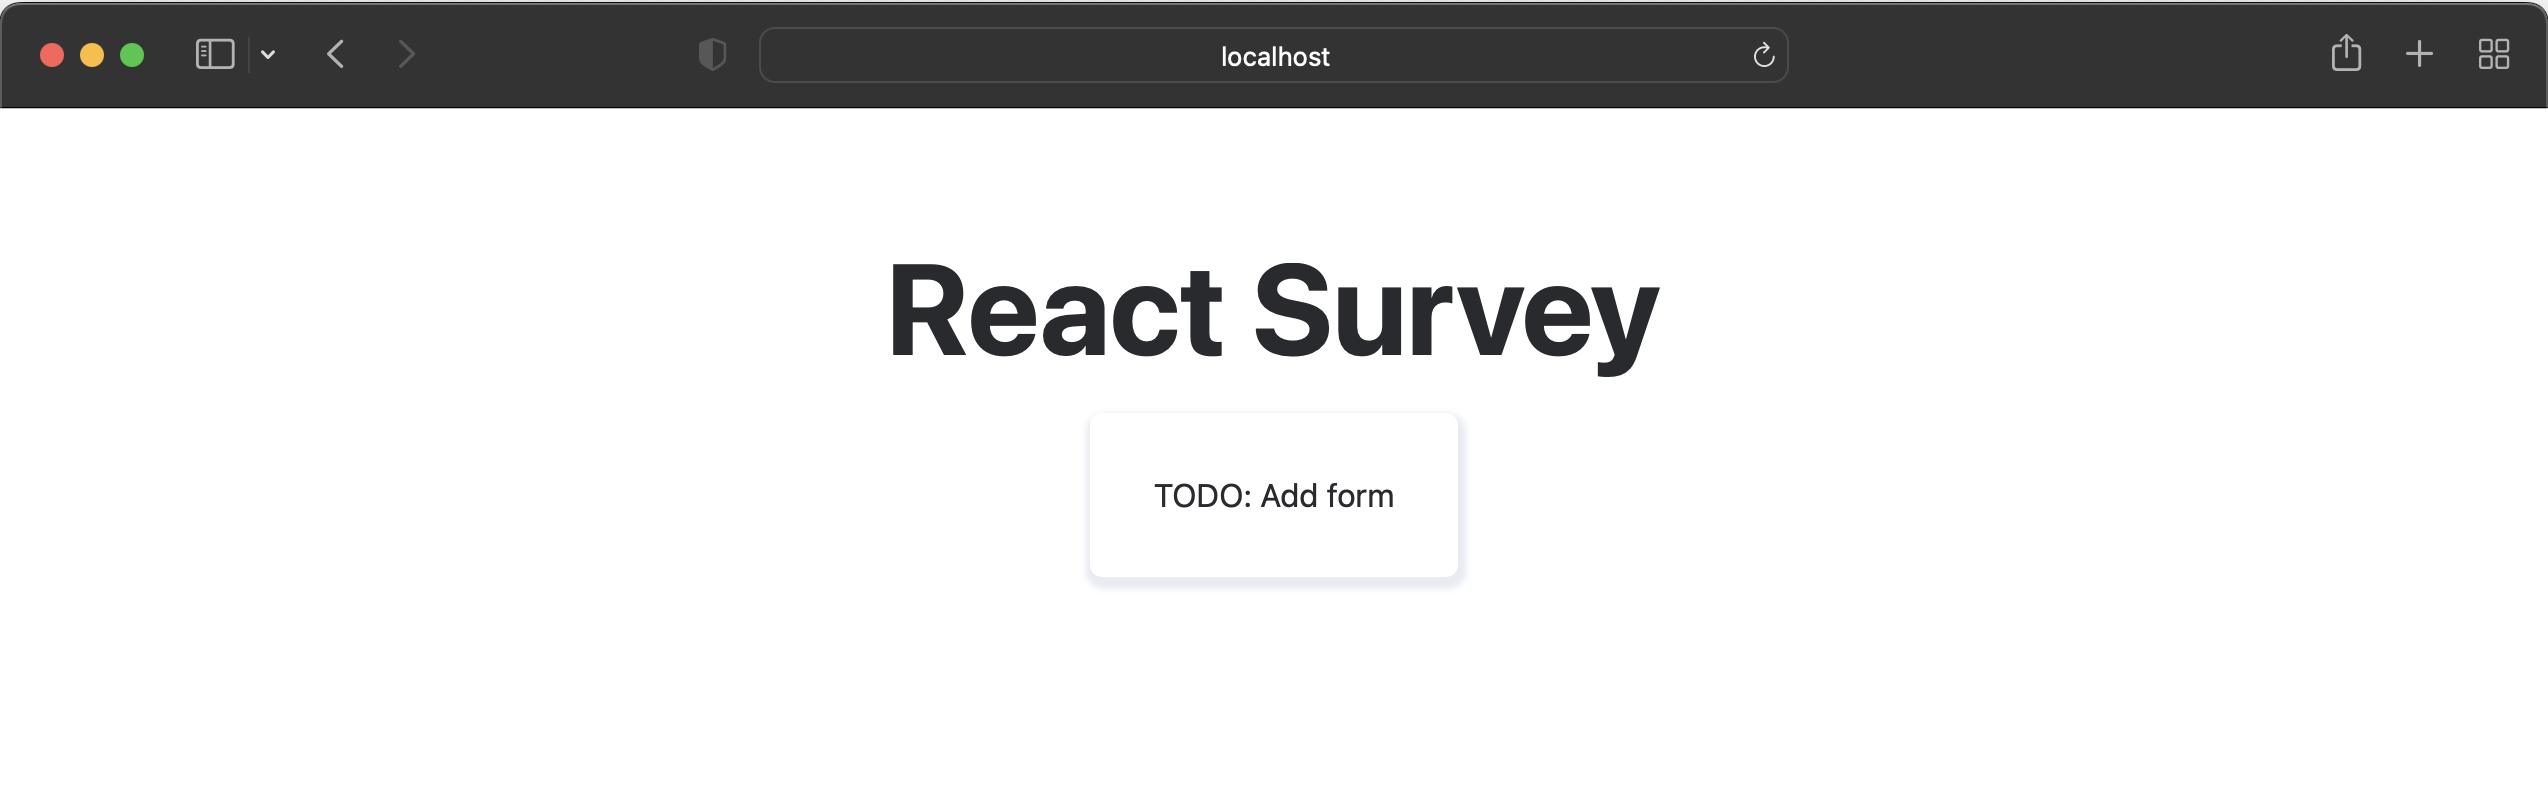
You'll find the code for this page in pages/index.js. Next.js uses file-system routing. Any file added to the pages folder will be a route. Every page is pre-rendered by default. This means that Next.js creates the HTML needed for each page at build time. When a page is loaded in the browser, only the JavaScript needed for the page is loaded. For example, the survey form that we'll create will be displayed on the page without needing JavaScript. The JavaScript code needed to make the form interactive will then run, this is called hydration. If you disable JavaScript in your browser, you'll see that the development server will still display the message "TODO: Add form".
The advantage of pre-rendering is better performance and SEO. You won't get these advantages if you create a client-side rendered React app using Create React App or Vite for example. Also, when you deploy to Vercel, Vercel automatically configures a global CDN for your project which further boosts performance.
The index page renders the SurveyForm component. This is the component that we'll use to create our survey form.
Adding CSS
The CSS styles are defined in the styles folder. There's basic styling added for the page and the form that we'll create. Feel free to change the styles if you want to. The global styles, globals.css, are imported into the _app.js file. Next.js uses an app component to initialize pages. You can override it and control the page initialization by creating an _app.js file in the pages directory. We did this in order to add global CSS styles.
The index page and SurveyForm component have locally scoped CSS: Home.module.css and SurveyForm.module.css. These CSS modules scope CSS by automatically creating unique class names. To learn more about the built-in CSS support in Next.js, you can check the docs.
Creating the survey form
Now let's create the survey form. We'll use Formik to create our form. Formik is a form library for React and React Native. It makes form validation, controlling form state, error handling, testing, refactoring, and form submission easier to implement.
Formik is especially useful if you have a complex form such as a multi-step form or if you have many forms. We'll also use the JavaScript library Yup with Formik for form validation. Yup will make validation more convenient as we can define our validations in an object schema.
In the SurveyForm component, import the following:
import { Formik, Form, Field, ErrorMessage } from 'formik';
import { JOB_TYPES } from '../constants';
The constants.js file contains some constants that we'll use to populate the <select> inputs of the form. They'll also be used for form validation.
Now replace the "TODO: Add form" text with the following code:
      <Formik
        initialValues={{ jobType: '' }}
        onSubmit={async (values) => {
          await new Promise((resolve) => setTimeout(resolve, 500));
          alert(JSON.stringify(values, null, 2));
        }}
      >
        <Form className={styles.form}>
          <label htmlFor="jobType">
            Are you a professional programmer or a student?
          </label>
          <Field as="select" name="jobType">
            <option disabled defaultValue value="">
              select an option
            </option>
            {JOB_TYPES.map((job) => (
              <option key={job.value} value={job.value}>
                {job.title}
              </option>
            ))}
          </Field>
          <small>
            <ErrorMessage name="jobType" />
          </small>
          <button type="submit" className={styles.button}>
            Submit
          </button>
        </Form>
      </Formik>
The Formik component helps build a form, it holds the form state using React Context. The intialValues property is an object that contains the initial field values of our form inputs. At the moment, the only input is jobType. The onSubmit property contains the submit handler function. At the moment it waits 500 ms after the form is submitted before displaying the submitted form values in an alert dialog.
The Field component hooks up inputs to Formik. It uses the name attribute to match up with the Formik state. The <Field> component will default to an input element. The as property indicates how the Field component should be rendered. In this case, the jobType field is rendered as a select element. The JOB_TYPES are mapped over to create option elements for each job type.
The ErrorMessage component will be used to display form validation error messages. It renders an error message if there's a validation error.
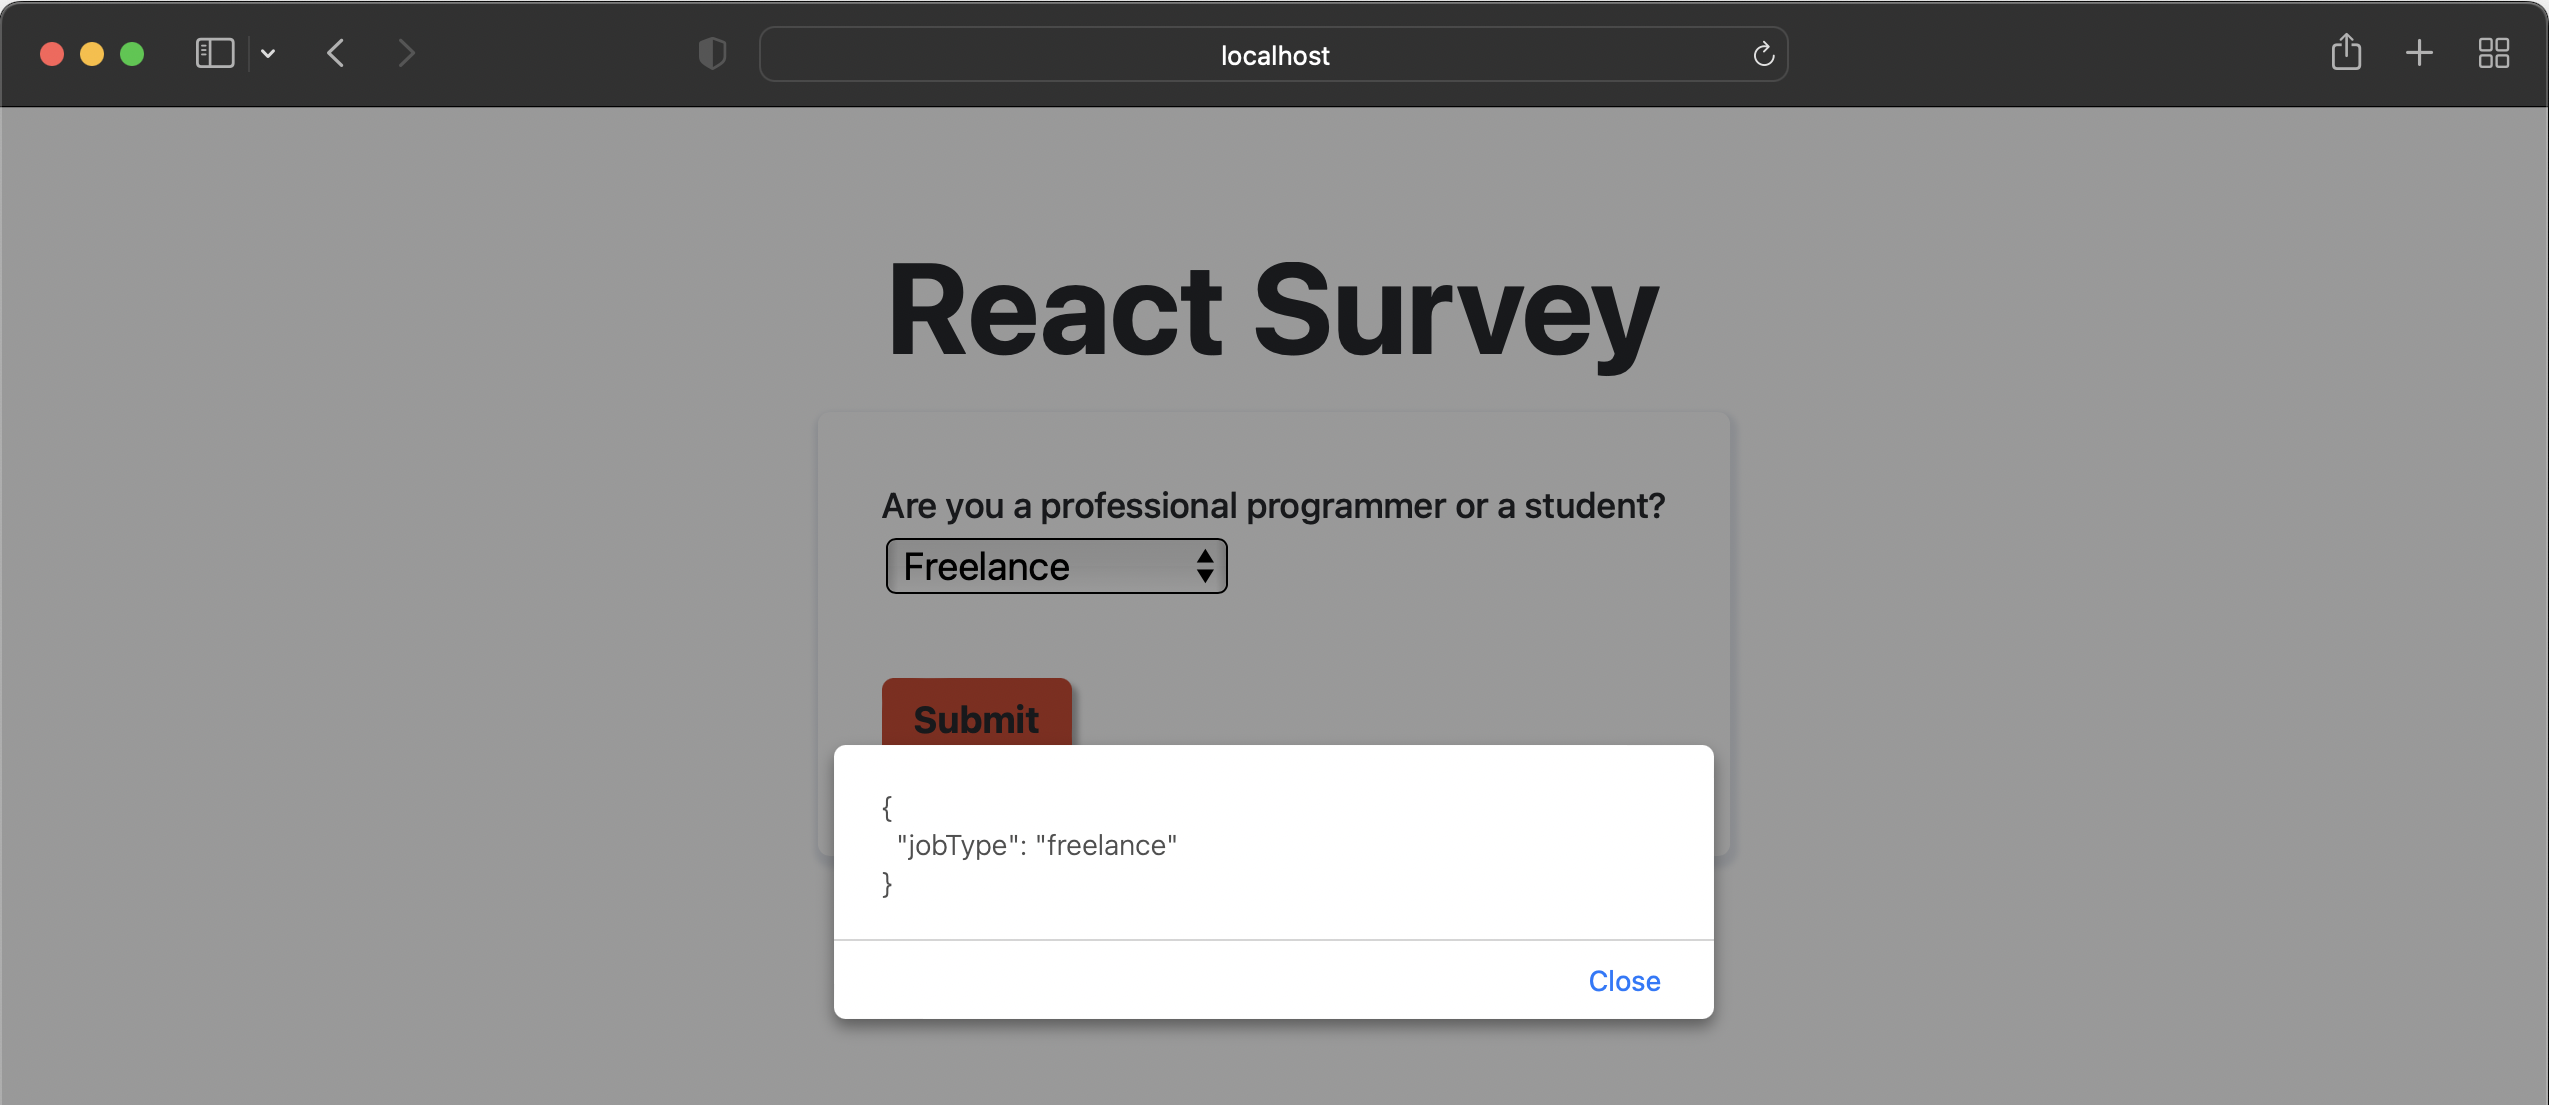
You'll see a short form in your development server now. If you submit the form, you'll get an alert dialog that shows the value of the jobType that you selected:
Now let's add the rest of the form fields, there will be six in total.
Import the following from constants.js:
import { JOB_TYPES, CODING_EXPERIENCE, WORKSHOP_INTEREST } from '../constants';
Change the Formik component's initialValues property to the following:
        initialValues={{
          jobType: '',
          yearsProgramming: '',
          yearsProgrammingReact: '',
          likes: '',
          dislikes: '',
          workshopInterest: '',
        }}
Then add the remaining form fields:
          <label htmlFor="yearsProgramming">
            How many years have you been programming for?
          </label>
          <Field as="select" name="yearsProgramming">
            <option disabled defaultValue value="">
              select an option
            </option>
            {CODING_EXPERIENCE.map((value) => (
              <option key={value} value={value}>
                {value}
              </option>
            ))}
          </Field>
          <small>
            <ErrorMessage name="yearsProgramming" />
          </small>

          <label htmlFor="yearsProgrammingReact">
            How many years have you been programming using React?
          </label>
          <Field as="select" name="yearsProgrammingReact">
            <option disabled defaultValue value="">
              select an option
            </option>
            {CODING_EXPERIENCE.map((value) => (
              <option key={value} value={value}>
                {value}
              </option>
            ))}
          </Field>
          <small>
            <ErrorMessage name="yearsProgrammingReact" />
          </small>

          <label htmlFor="likes">What do you like about React?</label>
          <Field
            id="likes"
            name="likes"
            placeholder="Add your answer"
            as="textarea"
          />
          <small>
            <ErrorMessage name="likes" />
          </small>

          <label htmlFor="dislikes">What do you dislike about React?</label>
          <Field
            id="dislikes"
            name="dislikes"
            placeholder="Add your answer"
            as="textarea"
          />
          <small>
            <ErrorMessage name="dislikes" />
          </small>

          <label htmlFor="workshopInterest">
            Are you interested in attending an in-person React workshop?
          </label>
          <Field as="select" name="workshopInterest">
            <option disabled defaultValue value="">
              select an option
            </option>
            {WORKSHOP_INTEREST.map((value) => (
              <option key={value} value={value}>
                {value}
              </option>
            ))}
          </Field>
          <small>
            <ErrorMessage name="workshopInterest" />
          </small>
You can change the questions on the form to suit your own needs. Now let's validate our form inputs.
Form input validation
We'll first create the Yup validation schema for our form fields. Create a helpers folder in the web directory and then create a validationSchema.js file inside of it. Add the following code for validating our first form field, jobType:
import * as yup from 'yup';
import { CODING_EXPERIENCE, JOB_TYPES, WORKSHOP_INTEREST } from '../constants';

export const validationSchema = yup.object({
  jobType: yup
    .string()
    .strict()
    .required('Answer is required')
    .test('validJob', 'Invalid job type', function (value) {
      const validJobTypes = JOB_TYPES.map((job) => job.value);
      return validJobTypes.includes(value);
    }),
});
We use Yup to define a validation schema object. For each field, we use Yup methods to parse and test the field values. If any of the fields fail validation, an error will be thrown that'll contain information about the validation error. This validation schema will be used by Formik for validation. The keys should match the name properties of the form Field components. The string() method is used to define a string value. It can coerce an input to a string by calling the toString method if the value exists. The strict() method sets strict to true. This prevents coercion, so a number won't be coerced into a string for example. The required() method means that the field value can't be null or undefined. The test() method allows us to create a custom validation function. If the value is valid, the function must return true. If the value is not valid, the function must return false or a ValidationError. You can read more about all of the available methods in the Yup GitHub repository.
Now add the rest of the keys for our validationSchema Yup object below the jobType key:
  yearsProgramming: yup
    .string()
    .strict()
    .required('Answer is required')
    .test(
      'validYearsProgramming',
      'Invalid number of years programming range',
      function (value) {
        return CODING_EXPERIENCE.includes(value);
      }
    ),
  yearsProgrammingReact: yup
    .string()
    .strict()
    .required('Answer is required')
    .test(
      'validYearsProgrammingReact',
      'Invalid number of years programming React range',
      function (value) {
        return CODING_EXPERIENCE.includes(value);
      }
    ),
  likes: yup
    .string('Enter what you like about React.')
    .strict()
    .min(2, 'Answer must be at least 2 characters long')
    .max(1000, 'The maximum number of characters is 1000')
    .required('Answer is required'),
  dislikes: yup
    .string('Enter what you dislike about React.')
    .strict()
    .min(2, 'Answer must be at least 2 characters long')
    .max(1000, 'The maximum number of characters is 1000')
    .required('Answer is required'),
  workshopInterest: yup
    .string()
    .strict()
    .required('Answer is required')
    .test(
      'validWorkshopInterest',
      'Invalid workshop interest',
      function (value) {
        return WORKSHOP_INTEREST.includes(value);
      }
    ),
Now let's add the validation schema to our form. In the SurveyForm component import the validationSchema:
import { validationSchema } from '../helpers/validationSchema';
In the Formik component, add the following property below the initialValues prop:
validationSchema={validationSchema}
The Formik validationSchema property is a special configuration property for Yup. It transforms Yup validation error messages into an object that has keys that should match, if we named them correctly, the form field values / initialValues. If there's a validation error, the error message will be displayed in the ErrorMessage component that has a name property that matches the error object key.
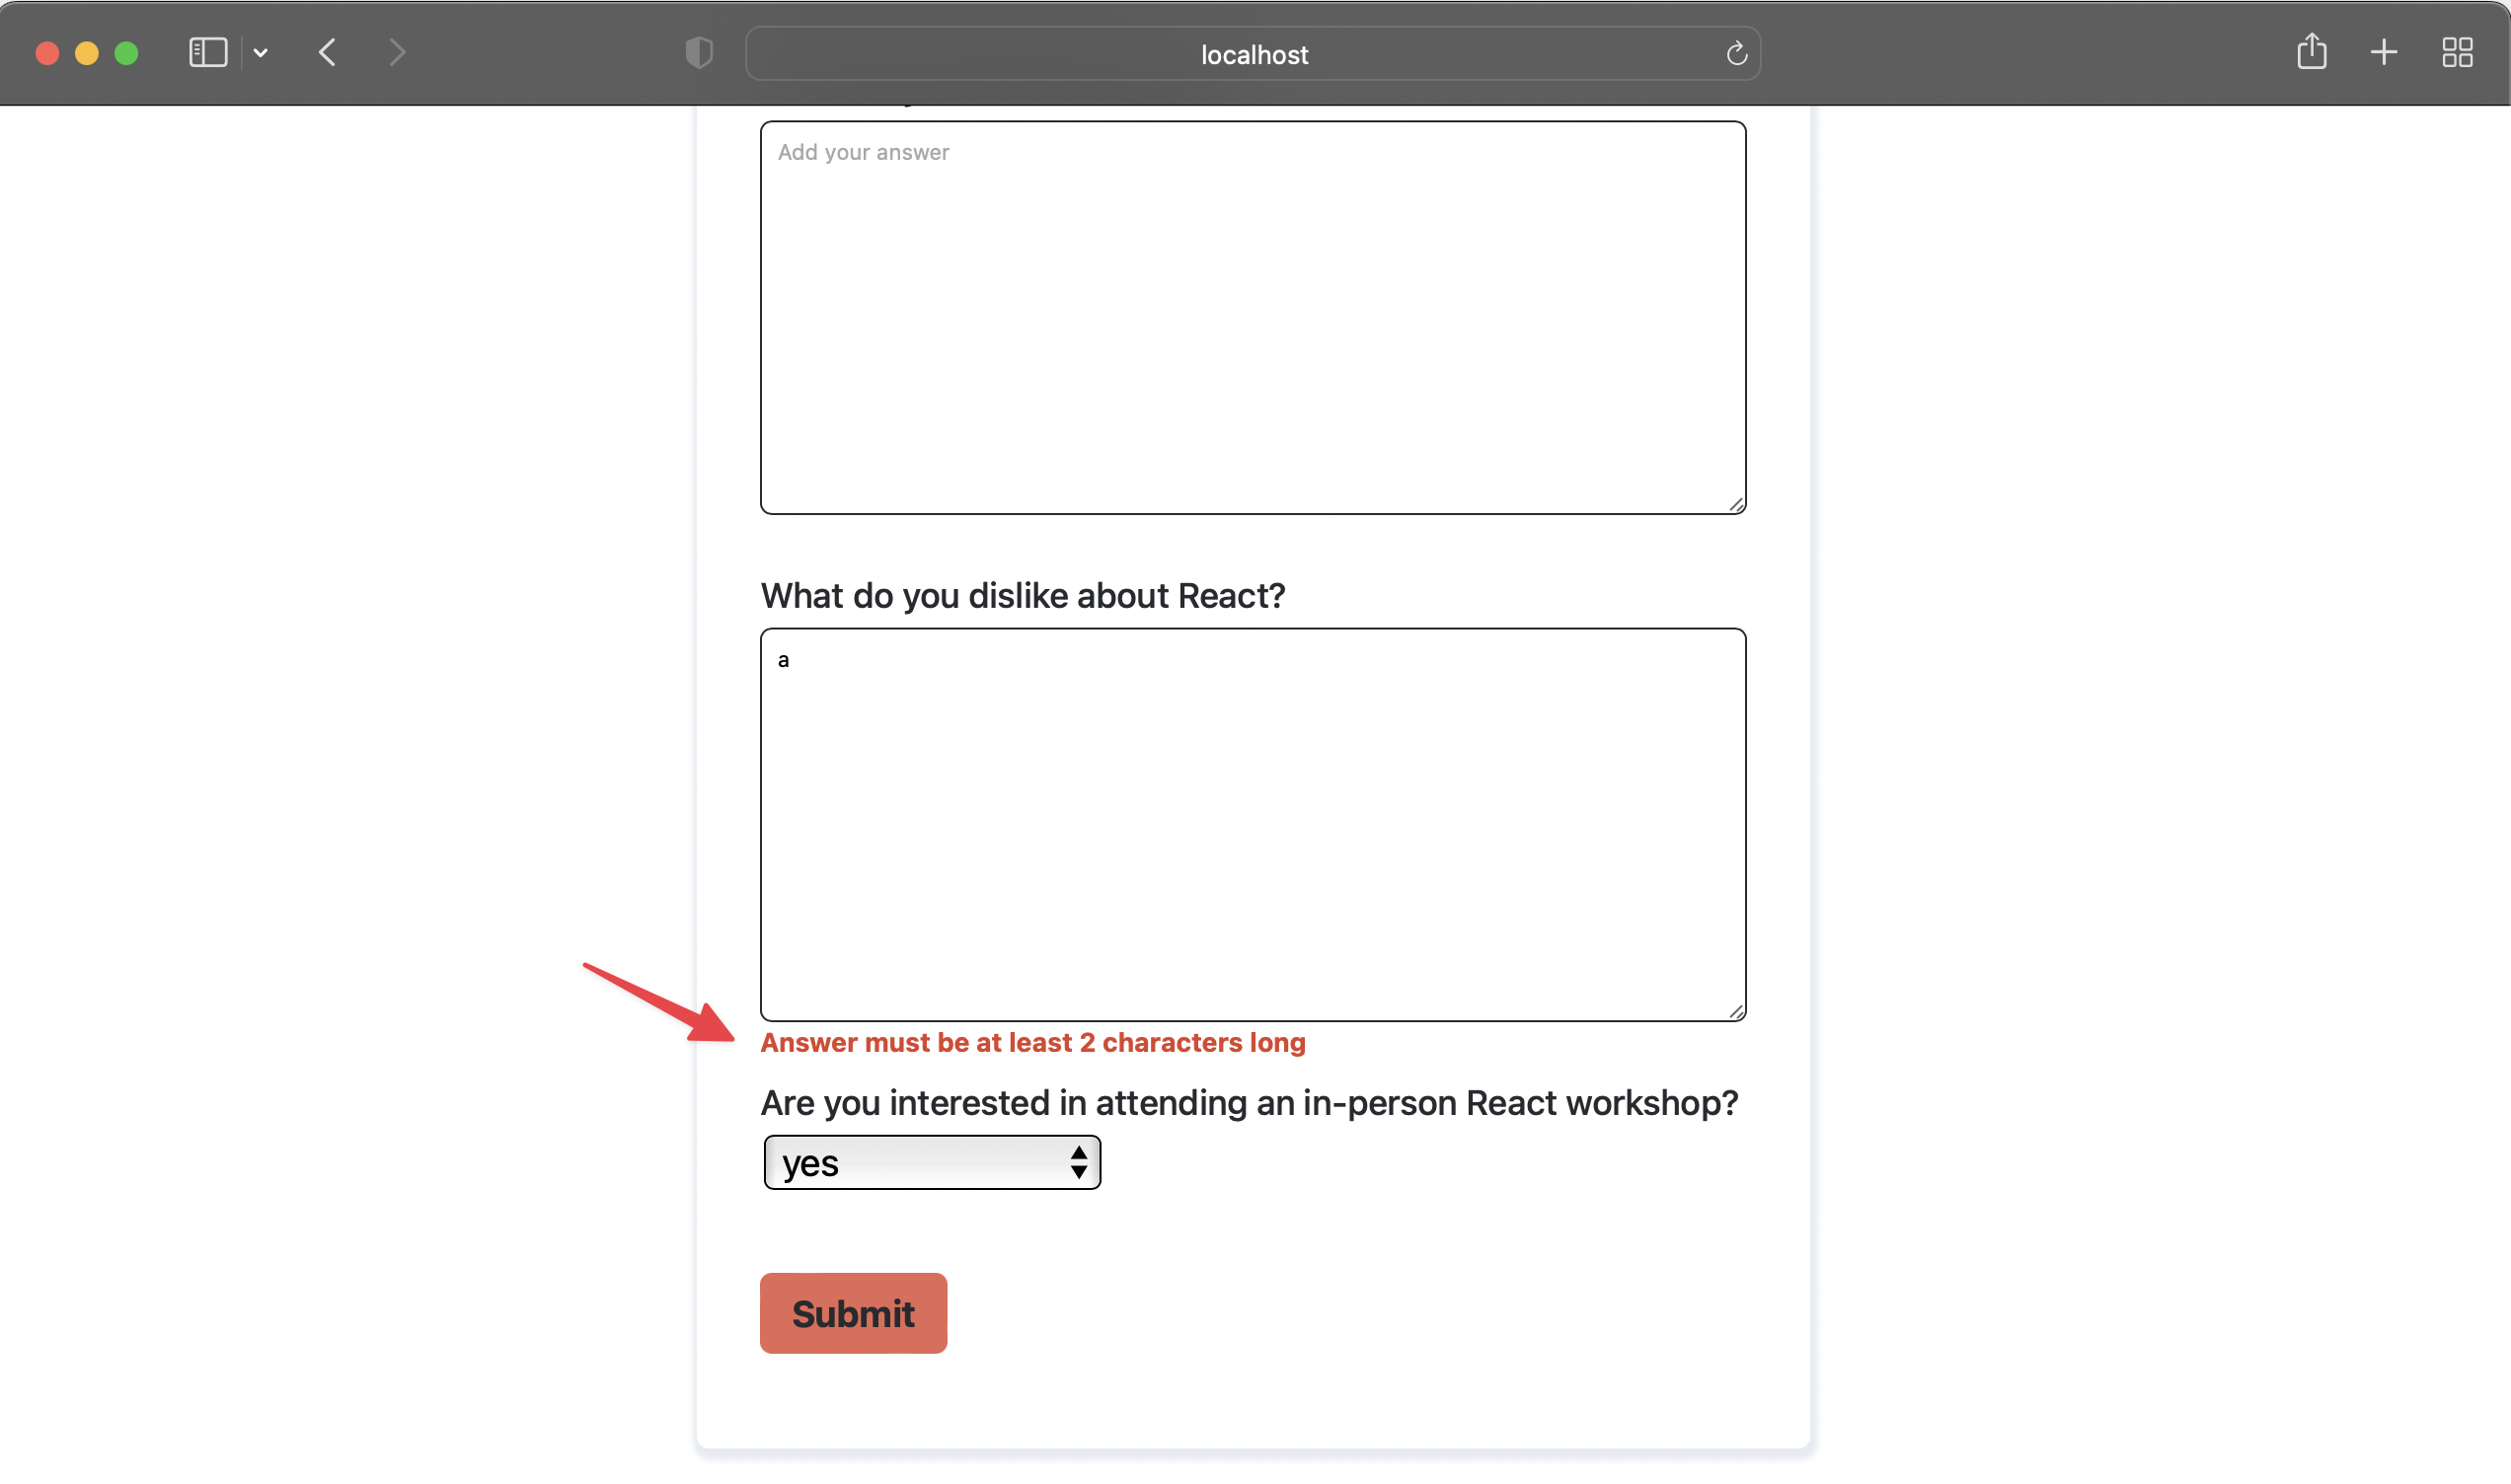
Now if you try to submit the form without filling in a field or if you add an invalid value, you'll get an error message, as defined in validationSchema.js:
Creating the Next.js API endpoint to submit survey data
Let's set up the form submission in our Next.js app. First, we'll create the Next.js API endpoint that will send our form data to Sanity. Go to the pages/api/createResponse.js file, this server-side Node.js code is our serverless function. In Next.js, any file inside of pages/api is mapped to the /api/* route. For the API route to work, we need to export the request handler function as default.
If a POST request is made to this route, http://localhost:3000/api/createResponse, a JSON response will be returned with the message value: "Response submitted". Any other type of HTTP request will return a JSON response with the message value: "Method not allowed". You can see this message by going to the API route in your development server. Our API route only needs to handle POST requests.
Import the Sanity Client:
import { sanityClient } from '../../utils/sanityClient';
The sanityClient.js is part of the starter repo. It uses the next-sanity library which is a toolkit that will allow us to easily connect with Sanity and add survey submissions as new documents in Sanity Studio. It uses the createClient method to connect with Sanity. We'll add the projectId, dataset, and token as environmental variables once we've created a Sanity project later in the tutorial. The useCdn property is set to false, you'd set this to true if you wanted to fetch content from Sanity's content delivery network. You'll be able to see what the latest apiVersion is in your Sanity Studio later. You can add the current date (YY-MM-DD) to get the newest version of the query API.
In the createResponse request function, add the following code above the POST request return:
  // Destructure the pieces of our request
    const {
      jobType,
      yearsProgramming,
      yearsProgrammingReact,
      likes,
      dislikes,
      workshopInterest,
    } = req.body;
    try {
      // Use our Client to create a new document in Sanity with an object
      await sanityClient.create({
        _type: 'surveyResponse',
        jobType,
        yearsProgramming,
        yearsProgrammingReact,
        likes,
        dislikes,
        workshopInterest,
      });
    } catch (err) {
      return res.status(500).json({ message: `Couldn't submit response` });
    }
We'll get the form field values from the req.body. We then use the sanityClient create method to create a survey response Sanity document. A document is what you create and edit inside of Sanity Studio.
Adding validation to the Next.js API endpoint
When you validate a form, you should validate the input on the client as well as on the server. Client-side validation can be bypassed easily, for example by disabling JavaScript or using curl. Client-side validation is used so that the user can get feedback, such as an error message, quickly if there was a validation error. We're going to use the same Yup validationSchema that we used to validate our form client-side. Yup allows us to easily use the same validation for our frontend and backend code.
First let's create a function that we'll use to check if our request data is valid. In the utils folder, create a file named isReqValid.js and add the following code:
export async function isReqValid(schema, body) {
  try {
    await schema.validate(body);
  } catch (error) {
    return false;
  }
  return true;
}
This function will take in a Yup schema and the request body containing our form data. It will try to validate the schema using the Yup validate method. If there are no validation errors, this async function will return true. If there are validation errors, Yup will throw an error and the function will return false.
Now go back to the createResponse.js API route and import the following:
import { validationSchema } from '../../helpers/validationSchema';
import { isReqValid } from '../../utils/isReqValid';
Then add the following above the req.body destructuring:
    // validation
    const isValid = await isReqValid(validationSchema, req.body);
    if (!isValid) {
      return res.status(422).json({
        message: 'Invalid request',
      });
    }
Our API endpoint will not make a request to Sanity if there's a validation error. Now that we've set up the backend API route, let's set up the frontend fetch requests that we'll make to pass our form data to our API route.
Sending data to the API endpoint from the frontend
In the starter repo, there's an apiClient.js file in the utils folder. This contains a fetch API wrapper function that we'll use to make HTTP requests to our API endpoint. The fetch API is promise based. This wrapper makes modifying fetch requests and handling errors easier. Handling errors with the fetch API is a bit tricky because it will only reject a promise if the actual request failed, for example due to a network error. It won't reject a promise if the response returned an error code and message. You need to check the ok property of the Response object and explicitly reject the promise if the ok property is false. The apiClient wrapper deals with this.
This wrapper function was copied from the following Kent C. Dodd's article: Replace axios with a simple custom fetch wrapper. You can learn more about the fetch wrapper in the article. Let's use this fetch wrapper function to send a request from our survey form to our API endpoint.
In SurveyForm.js import the following:
import { useState } from 'react';
import { client } from '../utils/apiClient';
We're going to use local React state for some form state. Add the following state variables and state variable setters:
  const [hasSubmitCompleted, setHasSubmitCompleted] = useState(false);
  const [responseMessage, setResponseMessage] = useState(false);
We'll use the hasSubmitCompleted state to show the user a message once the form submission is complete. The message will be stored in the responseMessage state variable.
Replace the onSubmit property of the Formik component with the following:
        onSubmit={(values, { resetForm, setSubmitting }) => {
          client('/api/createResponse', { body: values }).then(
            (data) => {
              // console.log('here is the data', data);
              setHasSubmitCompleted(true);
              setResponseMessage('Thanks for your response!');
              resetForm();
            },
            (error) => {
              // console.error('oh no, submission failed', error);
              setSubmitting(false);
              setHasSubmitCompleted(true);
              setResponseMessage(
                'There was an error submitting your response. Try again please.'
              );
            }
          );
        }}
We obtain the field values as well as the resetForm method and setSubmitting state setter from the form handler props. The resetForm method is part of the formik object. We'll use it to reset the form values after the form is submitted successfully. The setSubmitting state setter is used to set the isSubmitting state value. We set it to false if there's a submission error. Formik automatically sets it to false if the request is resolved successfully.
We use the fetch API wrapper function client to make the request to our API endpoint. We pass in the API URL and field values as arguments. If the request is successful, we set hasSubmitCompleted to true, set a success message for the user, and reset the form values.
If the request is unsuccessful, we set isSubmitting to false, hasSubmitCompleted to true and set an error message for the user.
To display the responseMessage to the user, we'll use some if statements to determine what the SurveyForm component should render based on the form's isSubmitting and hasSubmitCompleted state.
Add the following code just above the <Form className={styles.form}> line:
        {({ isSubmitting }) => {
          if (isSubmitting) {
            return <div>Submitting survey response…</div>;
          }
          if (hasSubmitCompleted) {
            return (
              <>
                <div>{responseMessage}</div>
              </>
            );
          }
          return (
To close the all of the parentheses and curly brackets, add the following code just above the </Formik> line:
          );
        }}
The Formik component accepts a function as its children. This function returns a React Element. This is known as a render prop. This function implements the render logic for the Formik component. If isSubmitting is true, we render a div element with the text "Submitting survey response…" instead of the form. If hasSubmitCompleted is true, the responseMessage is shown in a div. If neither of these is true the form is rendered.
If you try to submit the survey form in your development server, you'll briefly see the isSubmitting message and then you'll see the following response message:
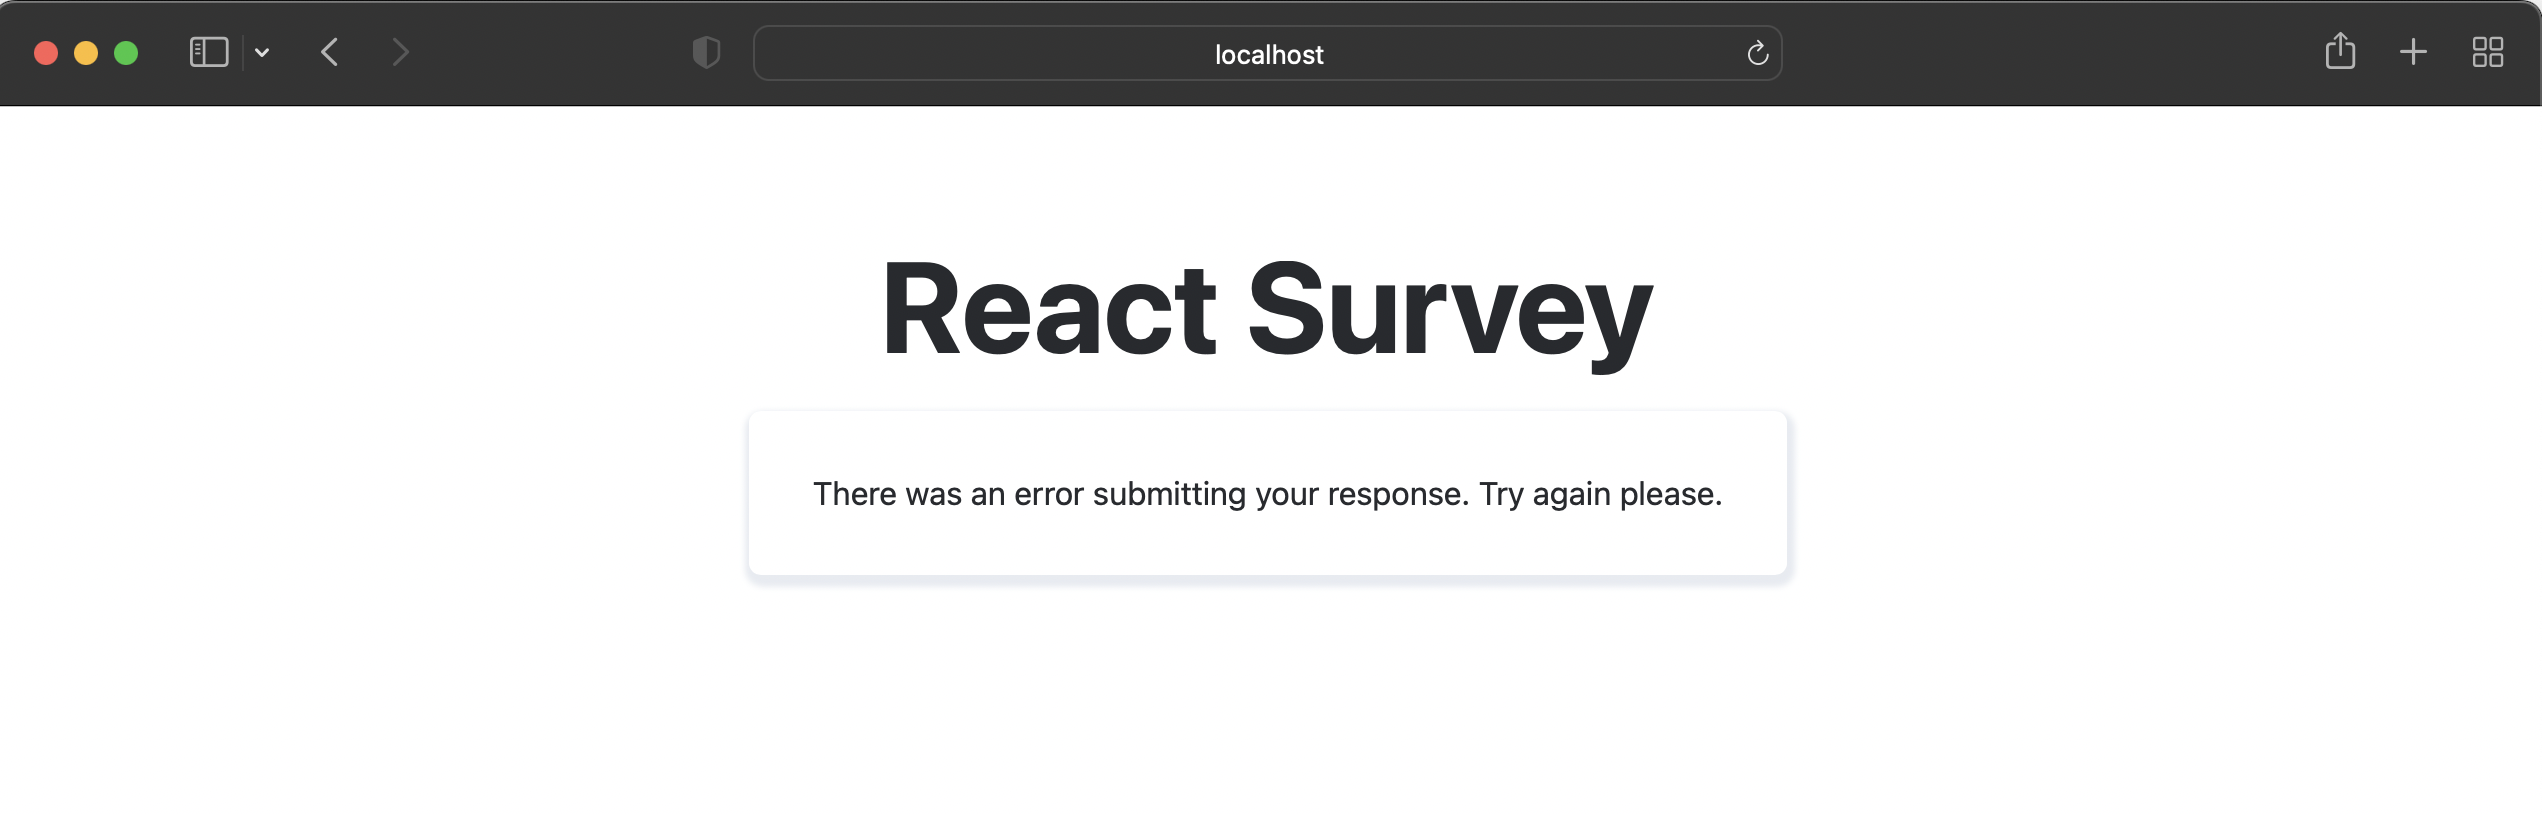
The survey user would need to refresh the page to try submitting again.
Now let's set up Sanity Studio so that we can successfully submit our survey responses and view the submissions.
Getting started with Sanity Studio
The first thing we'll do is install the Sanity CLI globally:
npm install -g @sanity/cli
We'll use the Sanity CLI to create a new project.
Then change the current directory to the studio folder and install the dependencies for Sanity Studio:
cd studio
yarn install
Now we'll set up a new project:
sanity init
This command can also be used to connect to an existing project.
You'll get a message in your terminal that says:
The current folder contains a configured Sanity studio. Would you like to reconfigure it? (Y/n)
Type y and press enter as we're going to reconfigure the existing Sanity Studio boilerplate code from the starter template.
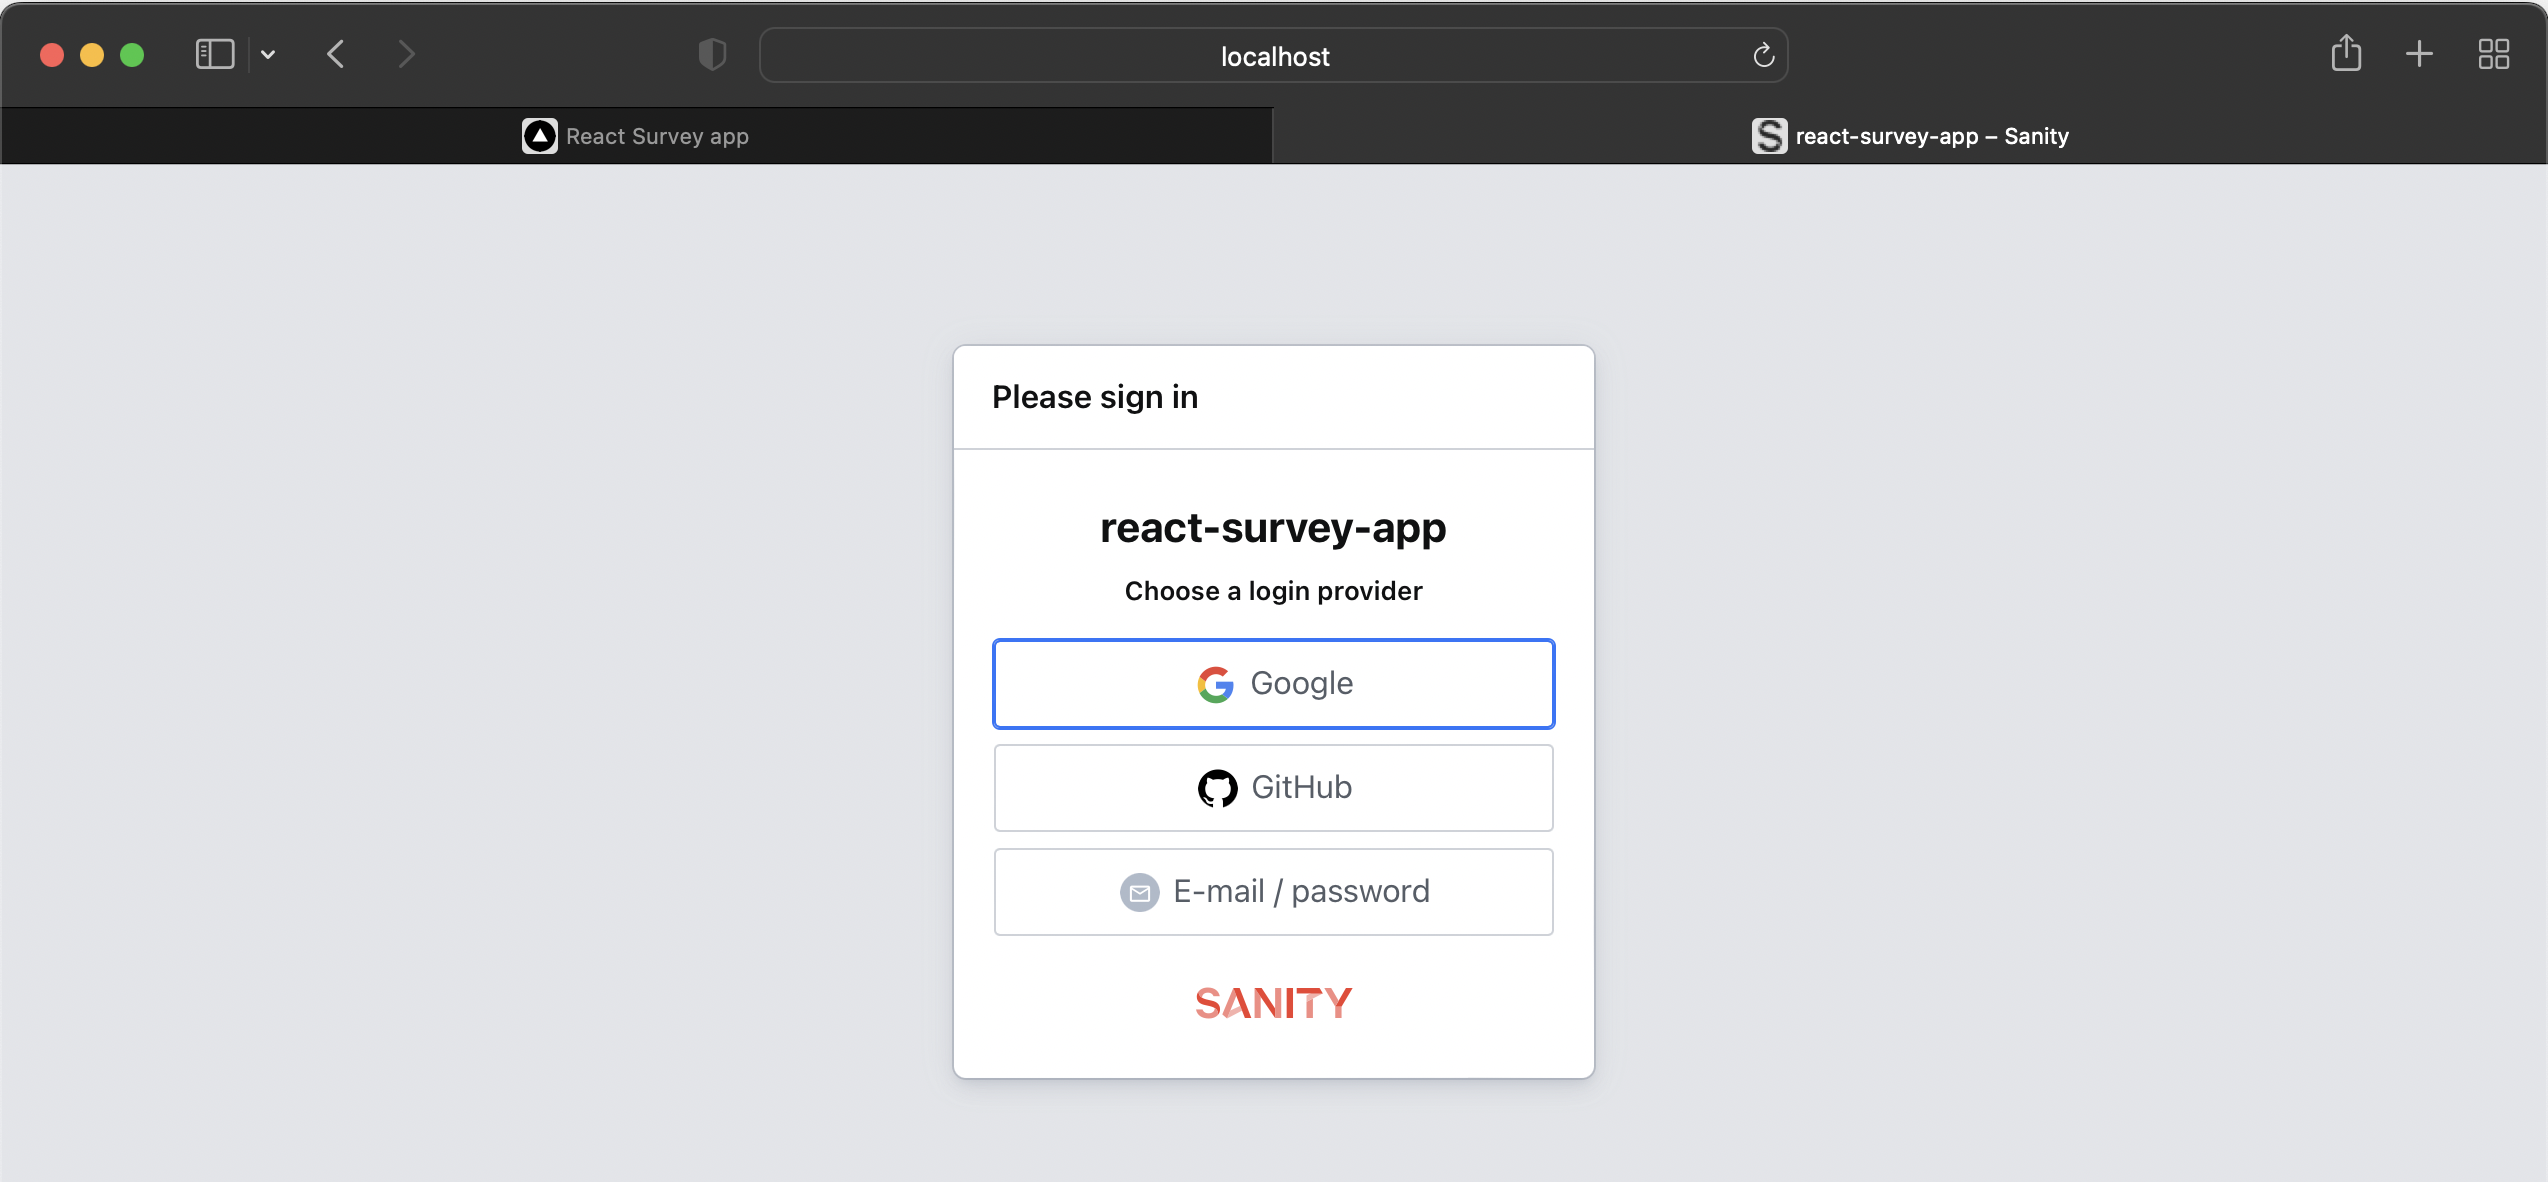
You'll get a message in your terminal to log in or create a new account. Choose one of the Login types presented:
? Login type
  Google
  GitHub
  E-mail / password
Once you've selected a login type, a new browser tab will be opened where you can create an account and login using the selected login type. Once you are done, you can close the tab and go back to your terminal.
The terminal message should say Login successful. Now in your terminal select:
create new project
Give your project a name, for example, react-survey-app then hit enter. You'll then get the following message:
Your content will be stored in a dataset that can be public or private, depending
on
whether you want to query your content with or without authentication.
The default dataset configuration has a public dataset named "production".
? Use the default dataset configuration? (Y/n)
Type n and hit enter. You'll then get a message to name your dataset. Give it a name such as results. You'll then get the following message:
 Choose dataset visibility – this can be changed later (Use arrow keys)
  Public (world readable)
> Private (authenticated requests only)
Select Private. We want a private dataset as we don't want anyone to be able to query the survey results.
Now let's run our Sanity Studio, which is a React app:
sanity start
A browser tab will open and you'll be asked to sign in to Sanity:
Once you've logged in you'll see your Sanity Studio. It's not empty as the starting code has a basic Sanity schema for our survey:
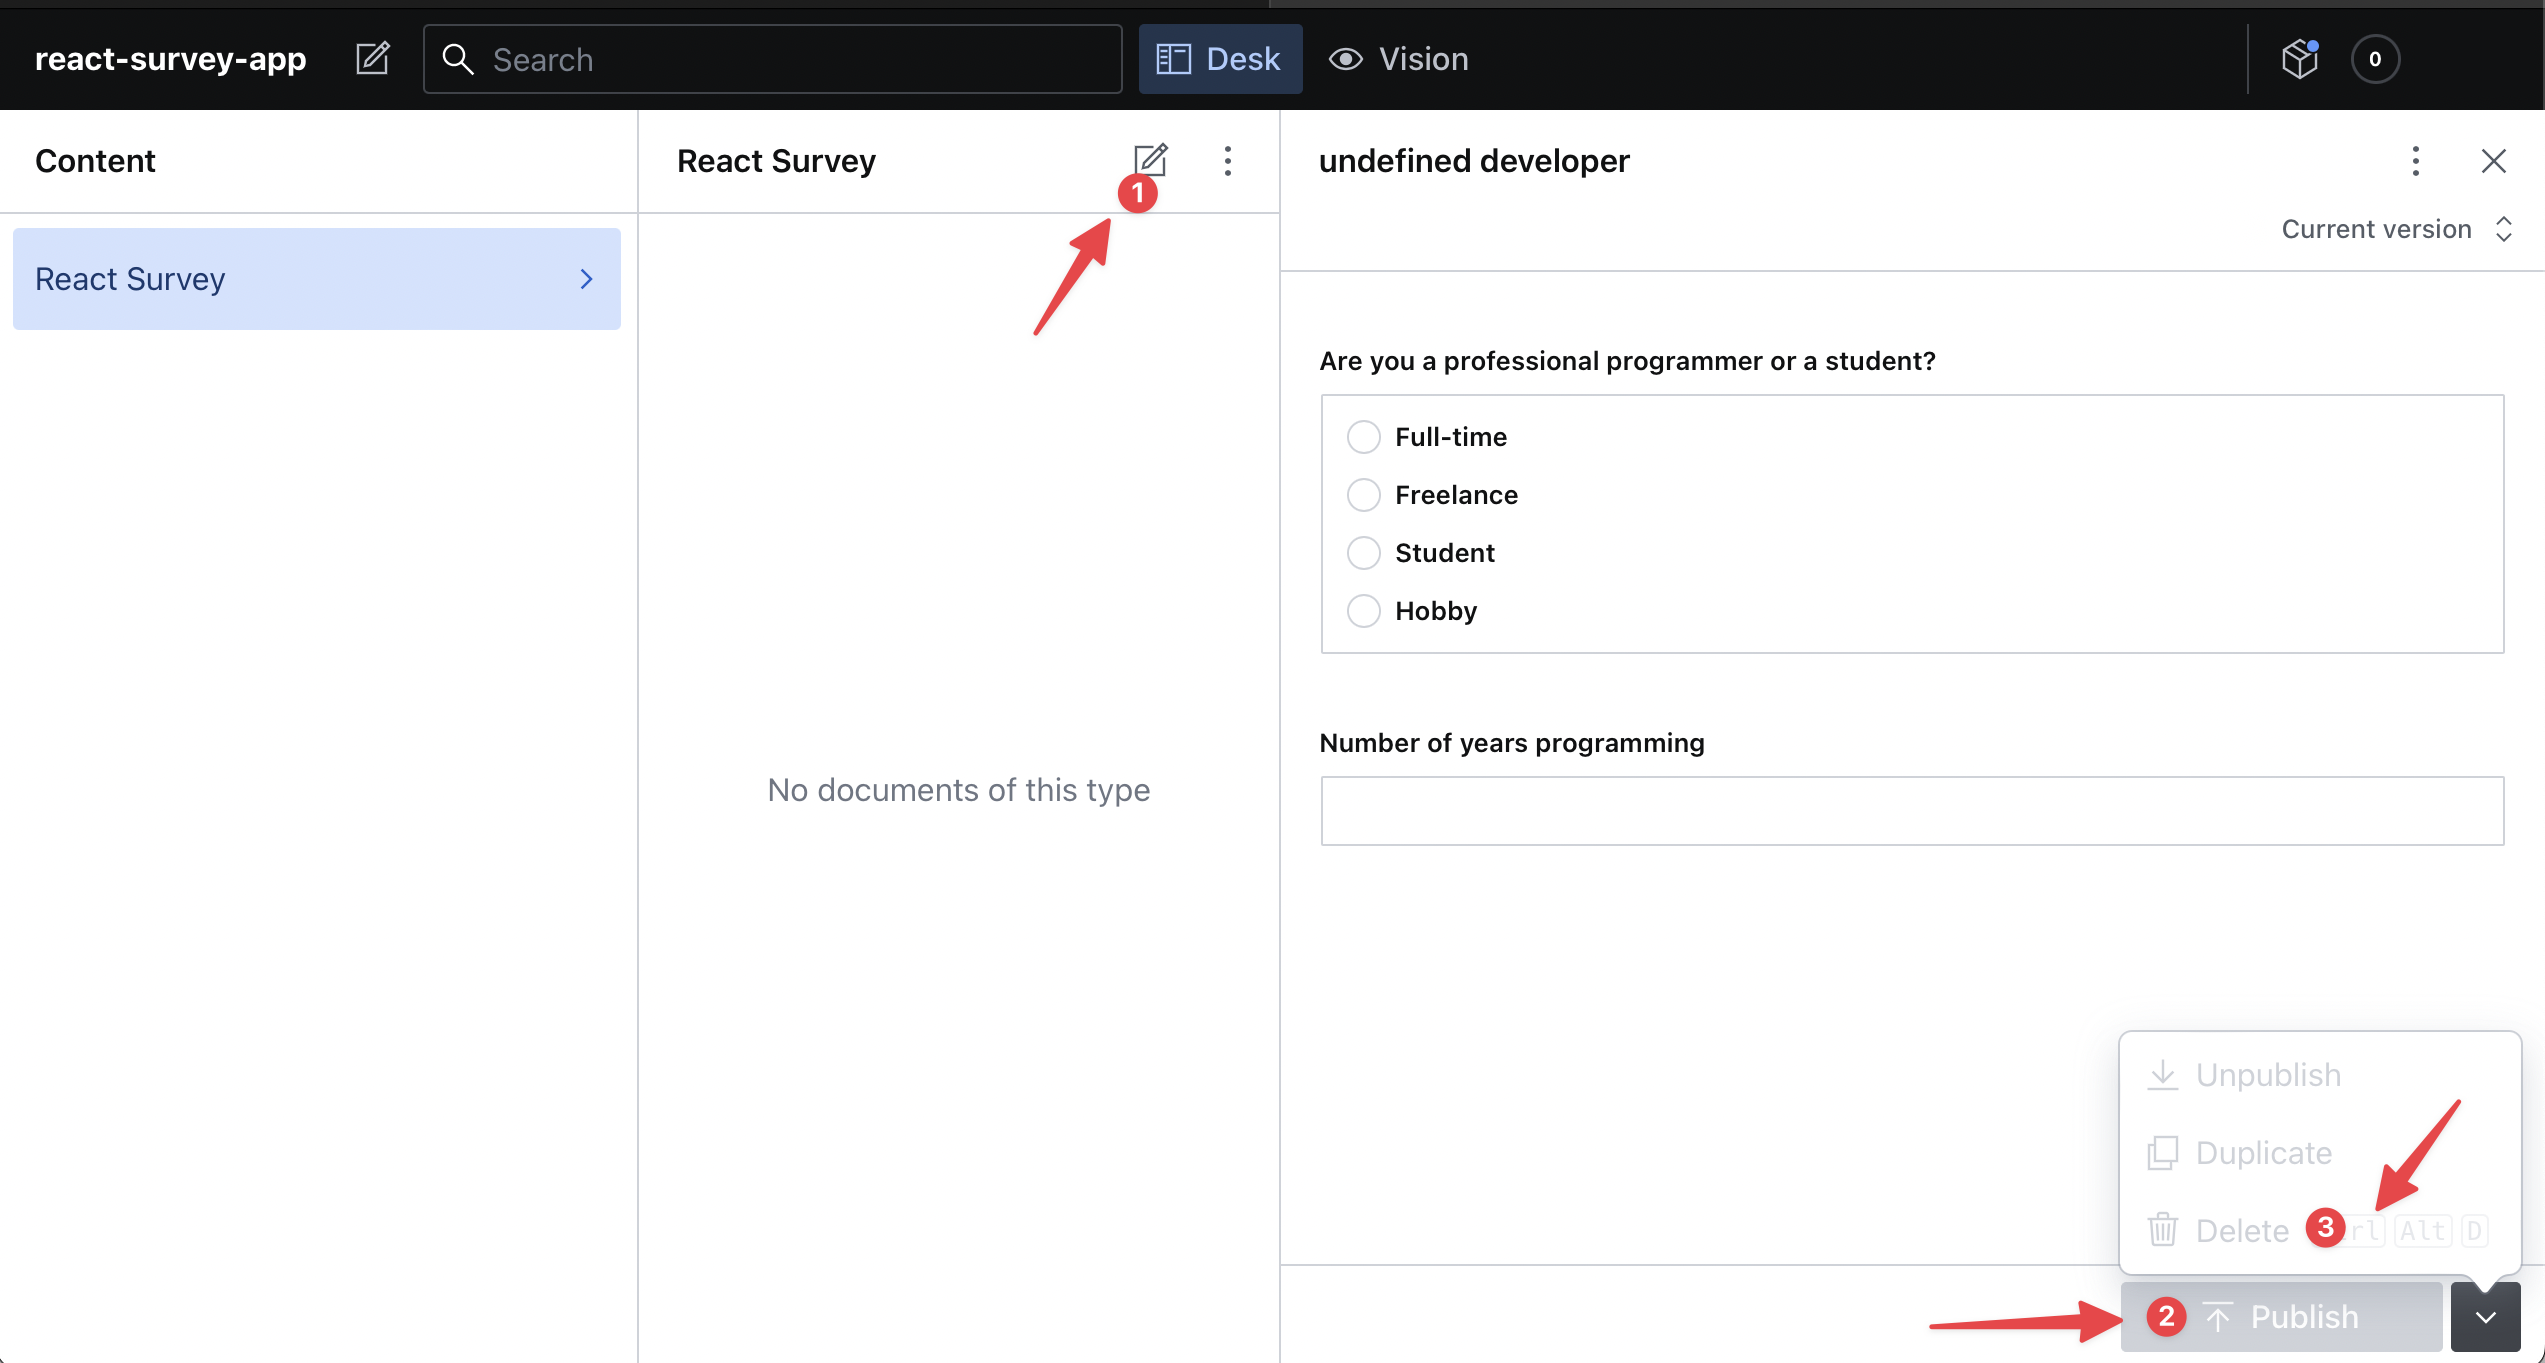
If you press the add document icon (1), the form on the right will appear. If you select one of the radio button options and add "0-1" for the "Number of years programming" input the Publish button (2) will turn green. If you press "Publish" it will add the Sanity document to your dataset. If you add "a" to the "Number of years programming" input, you'll get the following validation warning: "Invalid number of years programming range". This is defined in the starter code schema, we'll see how this is done soon. Once you've published a document, it'll appear in the middle column. You can delete it by selecting it and then going to the drop-down menu next to the "Publish" button and pressing "Delete" (3).
If you were creating a blog with Sanity, for example, this is how you would add data to Sanity Studio. We'll create documents from user input, using the sanityClient.create method in our Next.js API route.
Creating the Sanity Schema for survey responses
We need to set up the schema for our survey response data. To add a schema, you add a file to the schemas folder. The starter code already has a surveyResponse.js schema added. We'll need to fill it out for all of our survey questions. This file exports an object describing the survey data. It's imported into the schemas/schema.js file where it's used to create our schema. If we had multiple schemas, they'd all be imported into this file and combined to create our schema.
Now let's add to the existing survey response schema to describe the data for all of the survey questions. In the surveyResponse.js file, you'll see that there are some constants at the top of the file, these are the same constants that are in the web/constants.js file. The exported object describes our survey data, currently, it only describes the jobType and yearsProgramming fields. For each survey question, we'll add an object that describes the question data.
The title property is the title that we'll see in Sanity Studio. The name field should match the name property of the Formik Field component in our survey form on the front end. All of the fields that we'll use have a type of string. Sanity Studio has many different schema types.
The options property is for questions that have multiple options that can be selected. You can specify the list array containing all of the options and you can specify the layout, for example, "radio".
The validation property takes a function that receives Rule as its first argument. The function returns true if validation is successful. If validation fails, it returns an error message as a string. There are built-in validation methods such as required() to help you validate fields. If these methods aren't enough, you can create your own validation function using the custom() method.
Let's add all of the fields, add the following objects below the yearsProgramming object:
    {
      name: 'yearsProgrammingReact',
      title: 'Number of years programming using React',
      type: 'string',
      validation: (Rule) =>
        Rule.required().custom((yearsProgrammingReact) => {
          return CODING_EXPERIENCE.includes(yearsProgrammingReact)
            ? true
            : 'Invalid number of years programming React range';
        }),
    },
    {
      name: 'likes',
      title: 'What do you like about React?',
      type: 'string',
      validation: (Rule) => Rule.required().min(2).max(1000),
    },
    {
      name: 'dislikes',
      title: "What don't you like about React?",
      type: 'string',
      validation: (Rule) => Rule.required().min(2).max(1000),
    },
    {
      title: 'Are you interested in attending an in-person React workshop?',
      name: 'workshopInterest',
      type: 'string',
      options: {
        list: WORKSHOP_INTEREST,
        layout: 'radio', // <-- defaults to 'dropdown'
      },
      validation: (Rule) =>
        Rule.required().custom((workshopInterest) => {
          return WORKSHOP_INTEREST.includes(workshopInterest)
            ? true
            : 'Invalid workshop interest';
        }),
    },
You'll now see all of the fields for entering survey data in your Sanity Studio.
Connecting our Next.js app to Sanity Studio
Let's connect our Next.js app to Sanity Studio so that we can start receiving survey responses. In the web folder create a .env.local file and add the following lines to it:
NEXT_PUBLIC_SANITY_PROJECT_ID=
NEXT_PUBLIC_SANITY_DATASET=
SANITY_API_TOKEN=
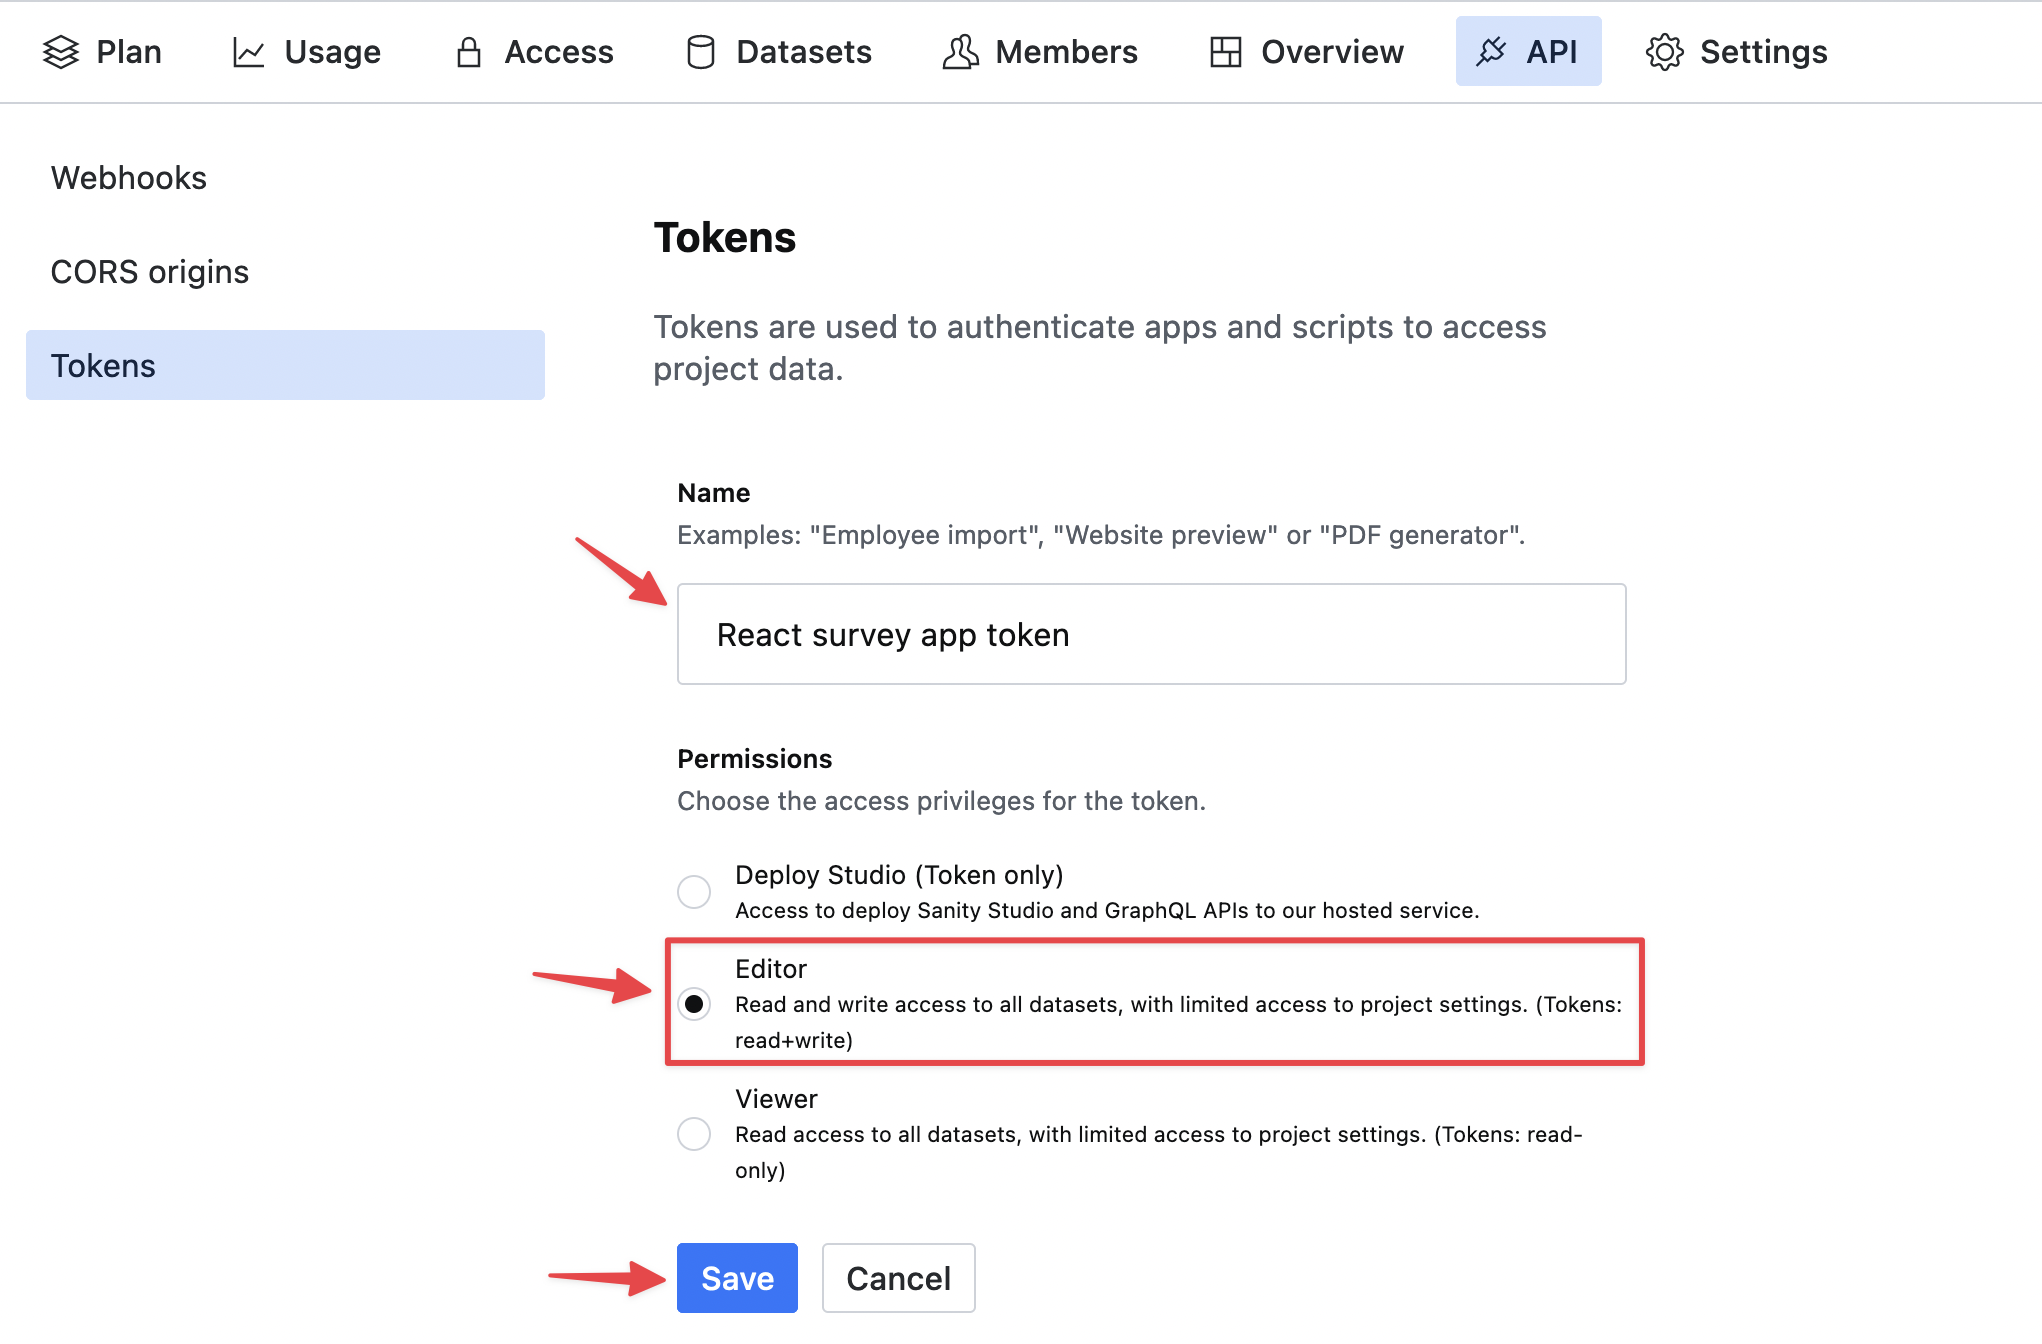
You can find the projectId and dataset name in the studio/sanity.json file. We'll need to create a Sanity API token. Go to https://www.sanity.io/manage, click on the block with your React survey project name, click on the "API" tab and then click "Add API token".
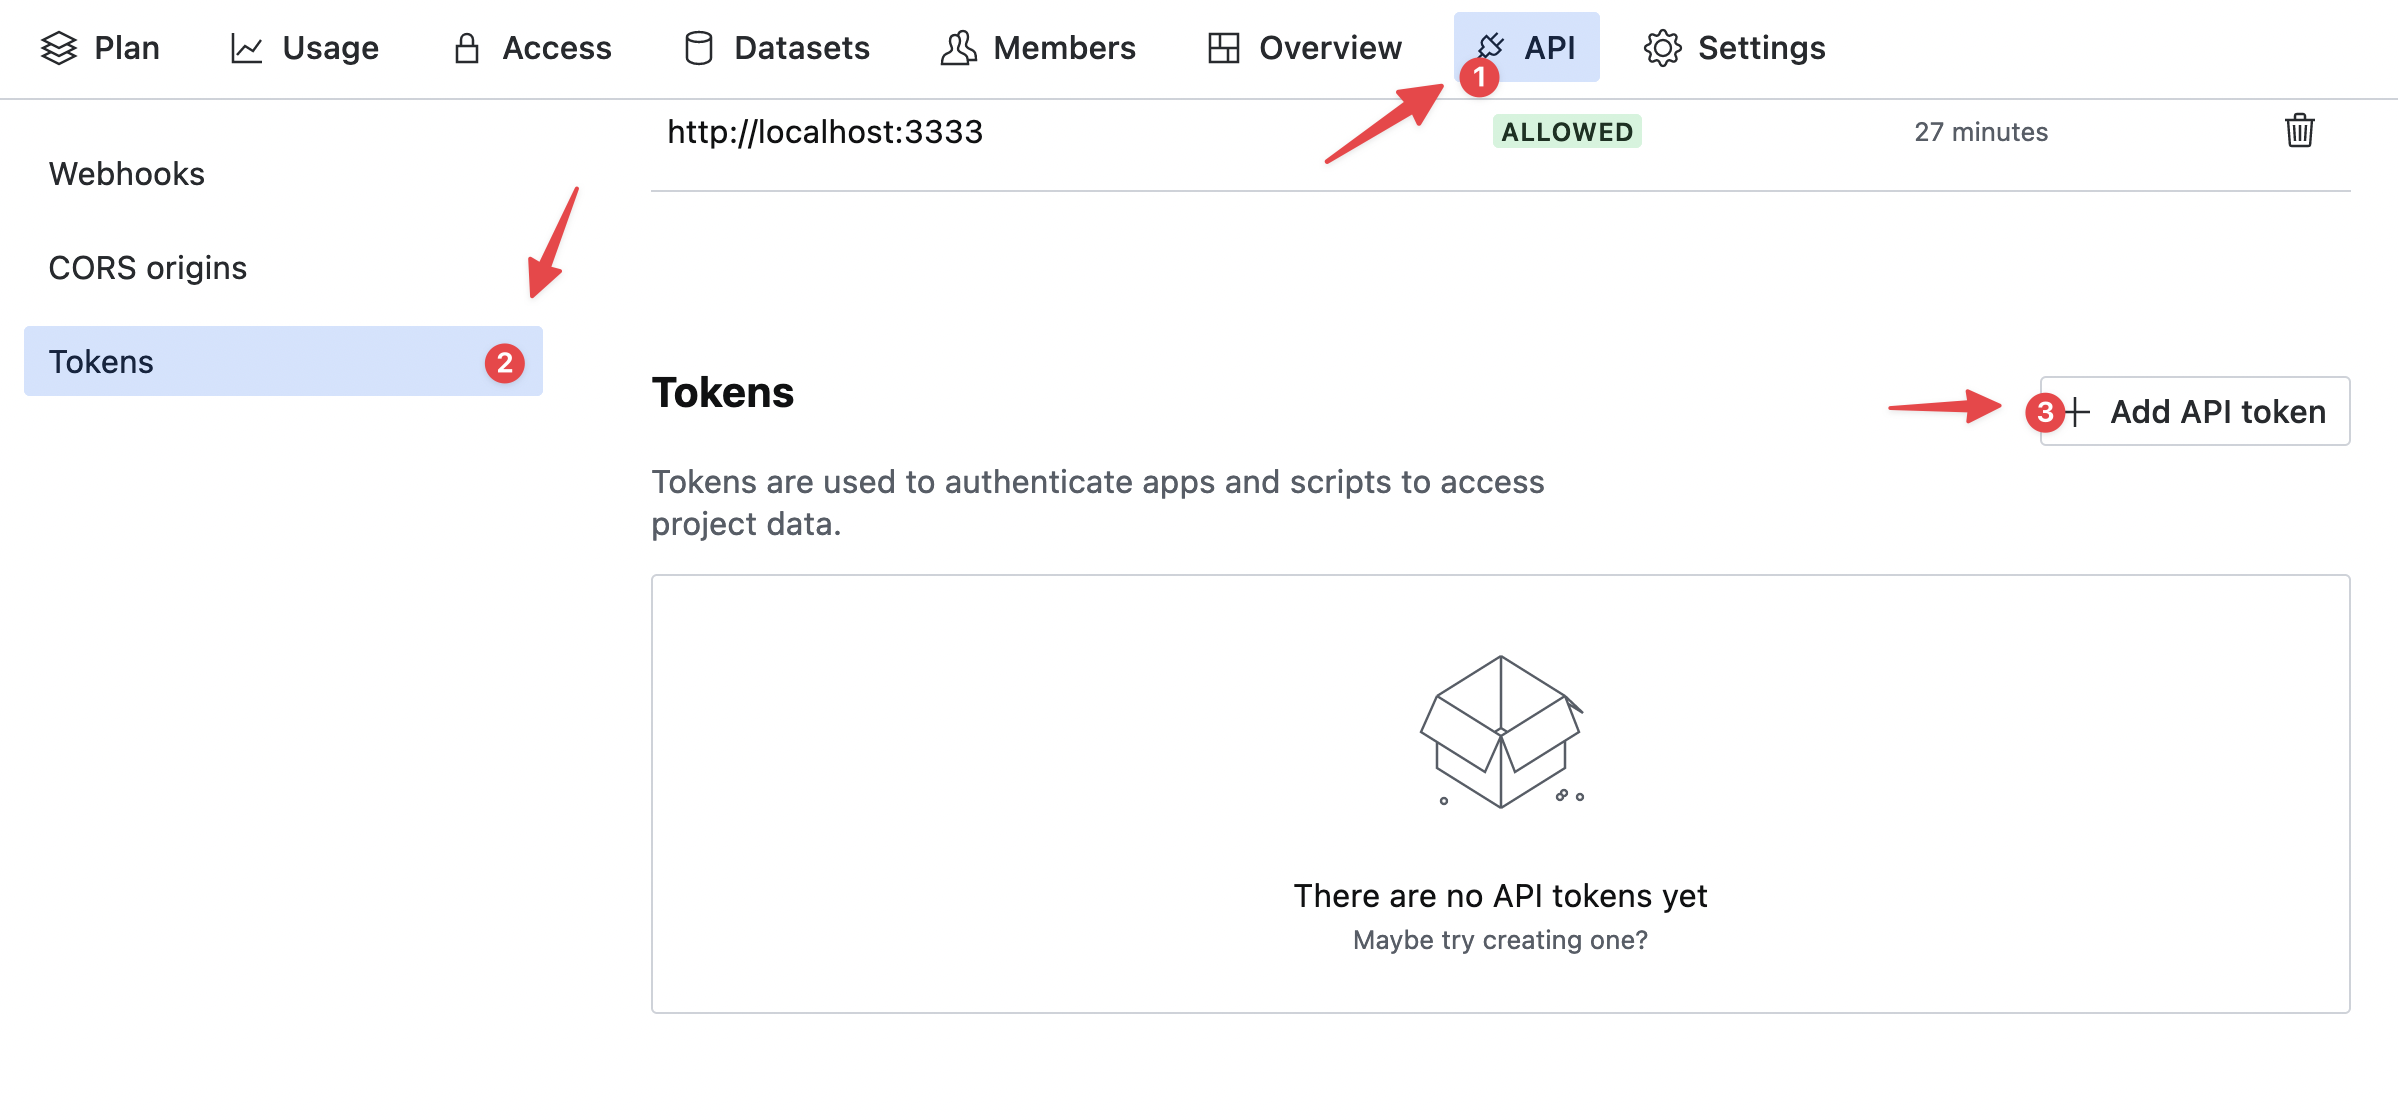
Give the token a name and then set the Permissions to "Editor".
Copy and add the token to the web/.env.local file, we'll call it SANITY_API_TOKEN. Now start your Next.js development server:
cd web
yarn dev
Submit a survey response. You'll be able to see your survey response in Sanity Studio.
Improving the Sanity Studio preview for the survey responses in the list view
You'll notice that the list view for our React survey responses in the middle column of our Sanity Studio is not very helpful. Let's improve it so that we can get more information about each survey response at a glance.
In the studio/schemas/surveyResponse.js file, import React at the top:
import React from 'react';
Replace the preview property with the following:
preview: {
select: {
yearsProgramming: 'yearsProgramming',
yearsProgrammingReact: 'yearsProgrammingReact',
jobType: 'jobType',
workshopInterest: 'workshopInterest',
},
prepare(selection) {
const {
yearsProgramming,
yearsProgrammingReact,
jobType,
workshopInterest,
} = selection;
const jobName =
jobType &&
JOB_TYPES.flatMap((option) =>
option.value === jobType ? [option.title] : []
);
const EMOJIS = {
yes: '✔',
no: '❌',
maybe: '🤷♂️',
};
return {
title: `${jobName} developer`,
subtitle: `Years programming: ${yearsProgramming}. Years programming React: ${yearsProgrammingReact}`,
// Remember to import React from 'react' if you are rendering React components like below
media: (
<span style={{ fontSize: '1.5rem' }}>
{workshopInterest ? EMOJIS[workshopInterest] : '❔'}
</span>
),
};
},
},
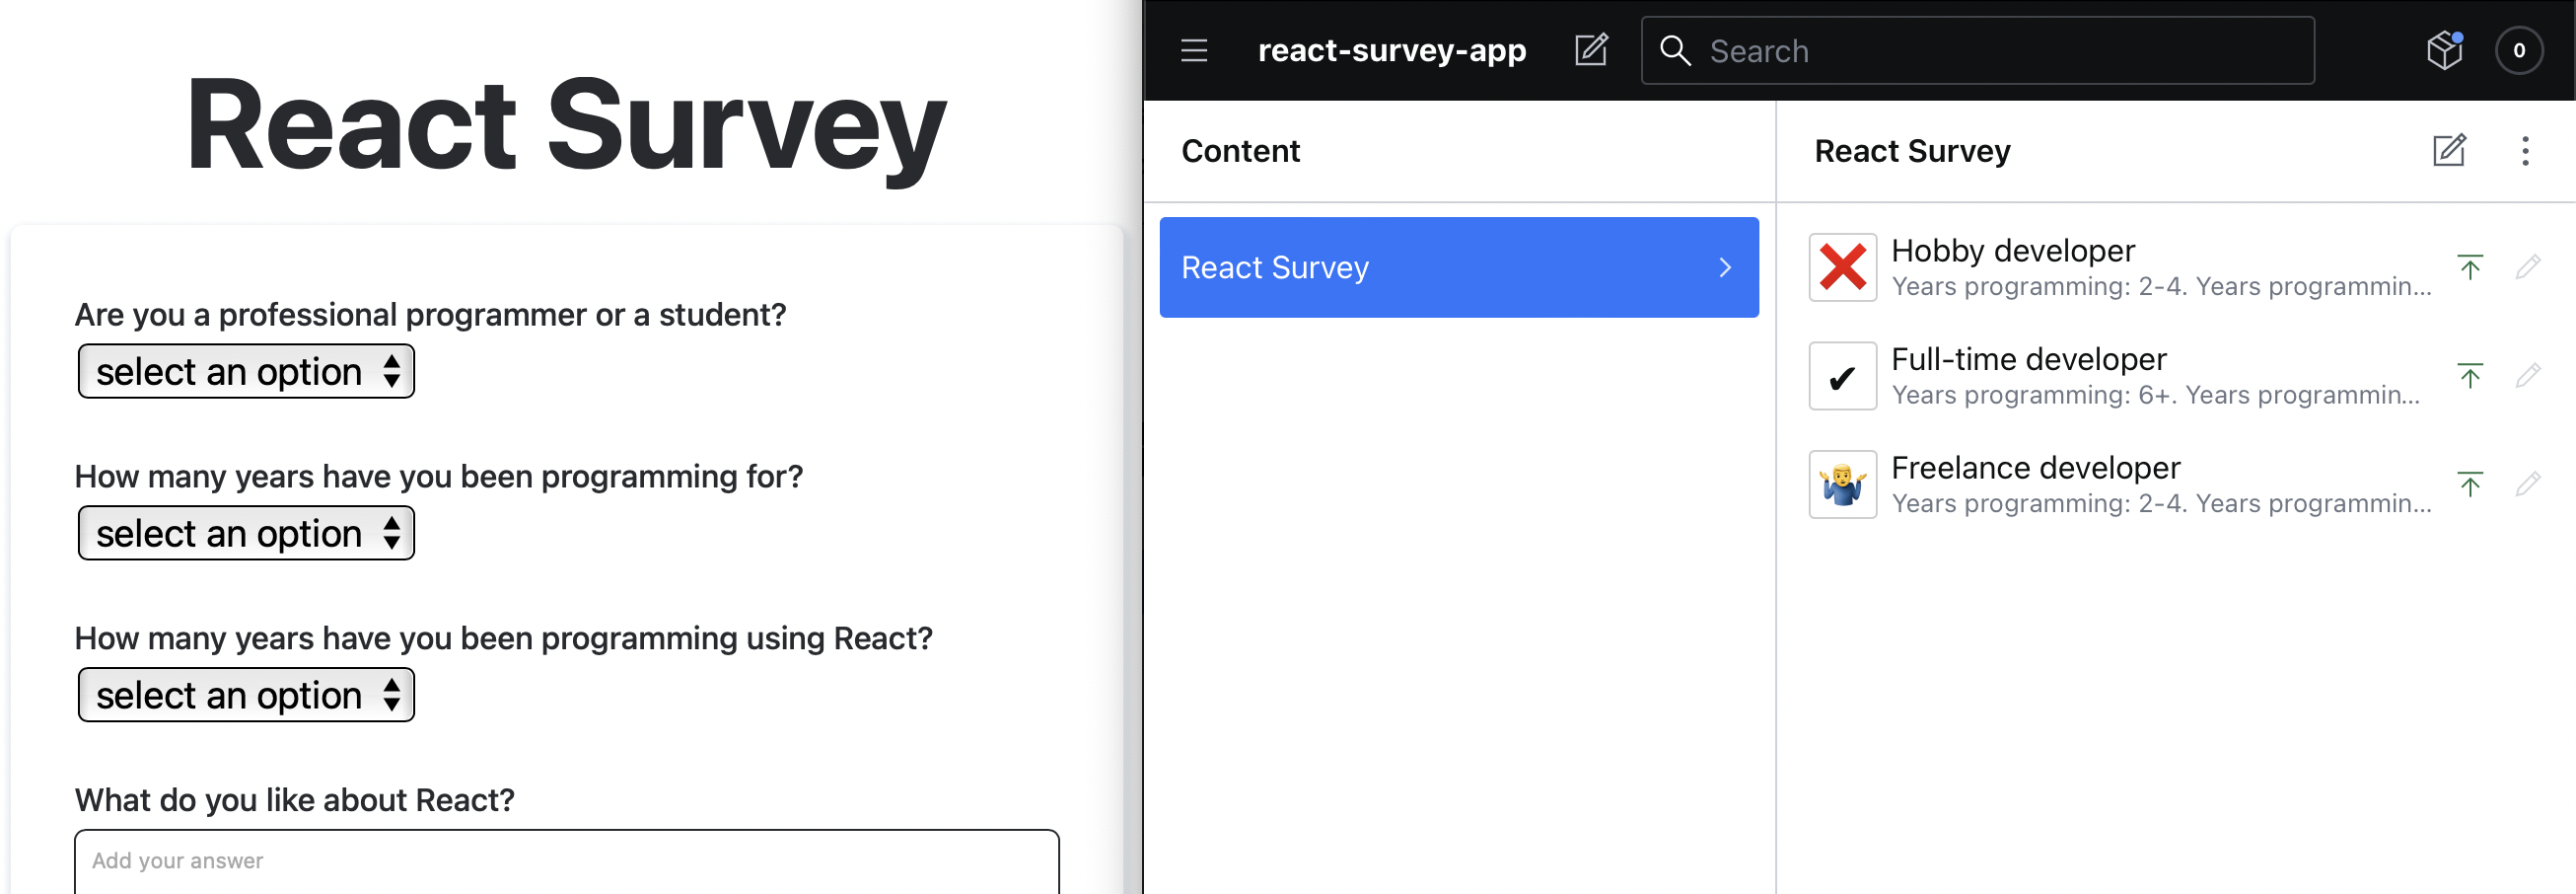
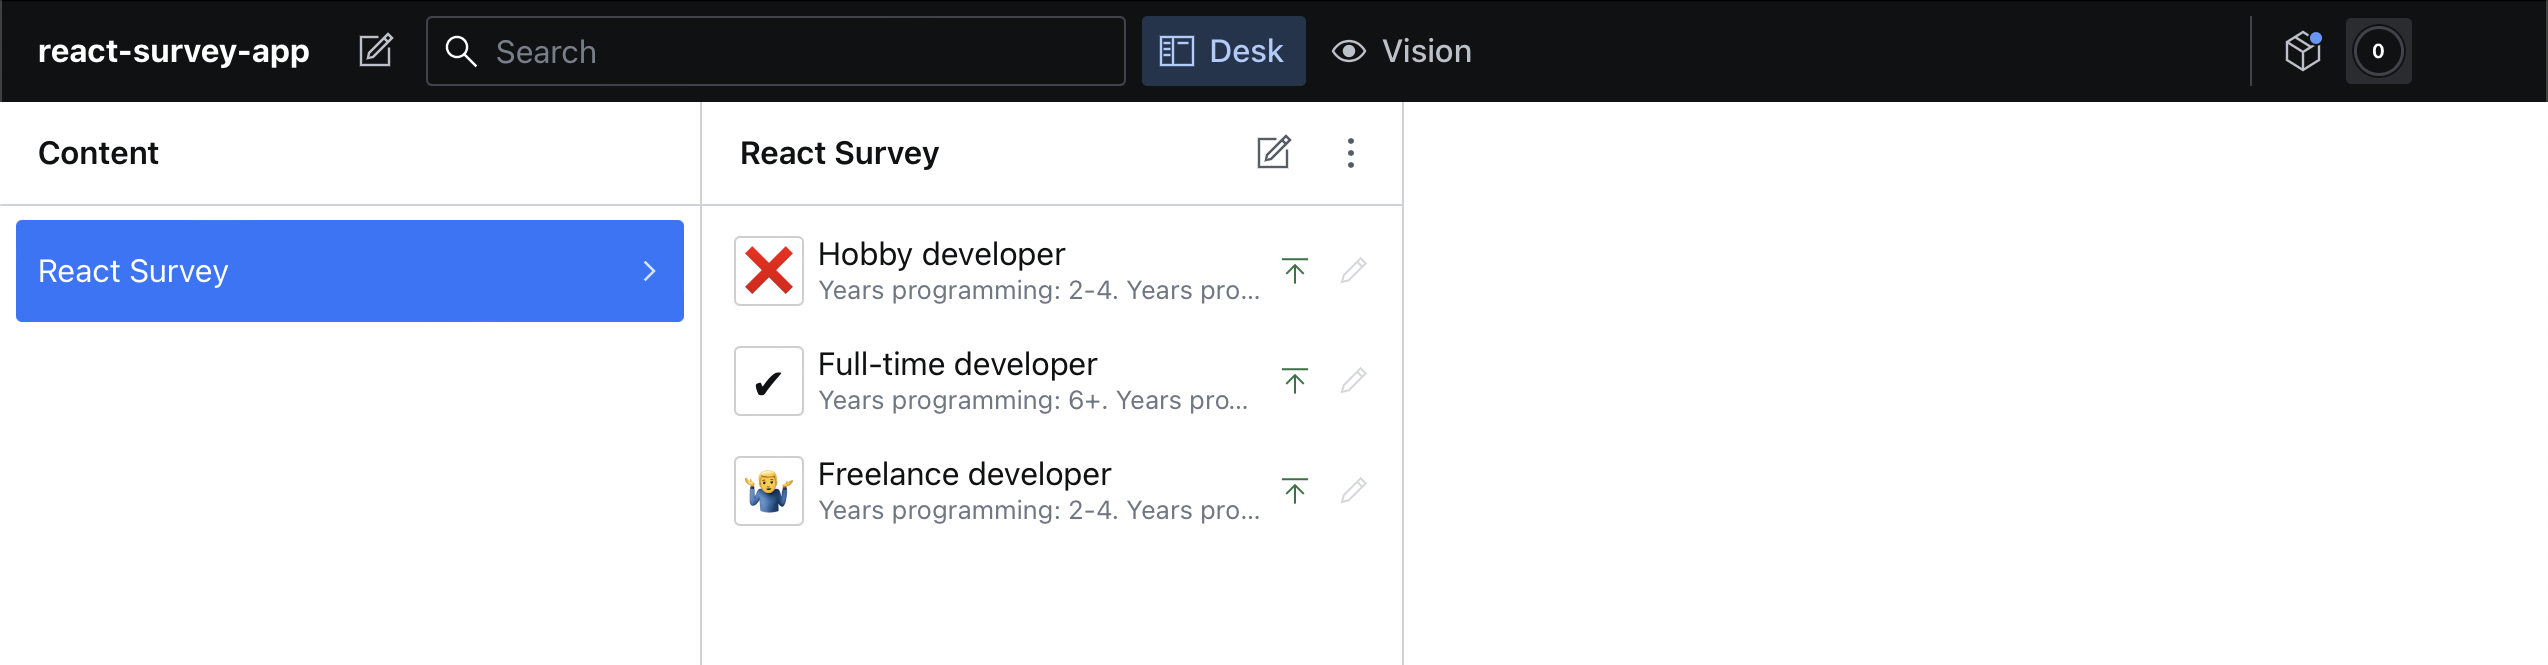
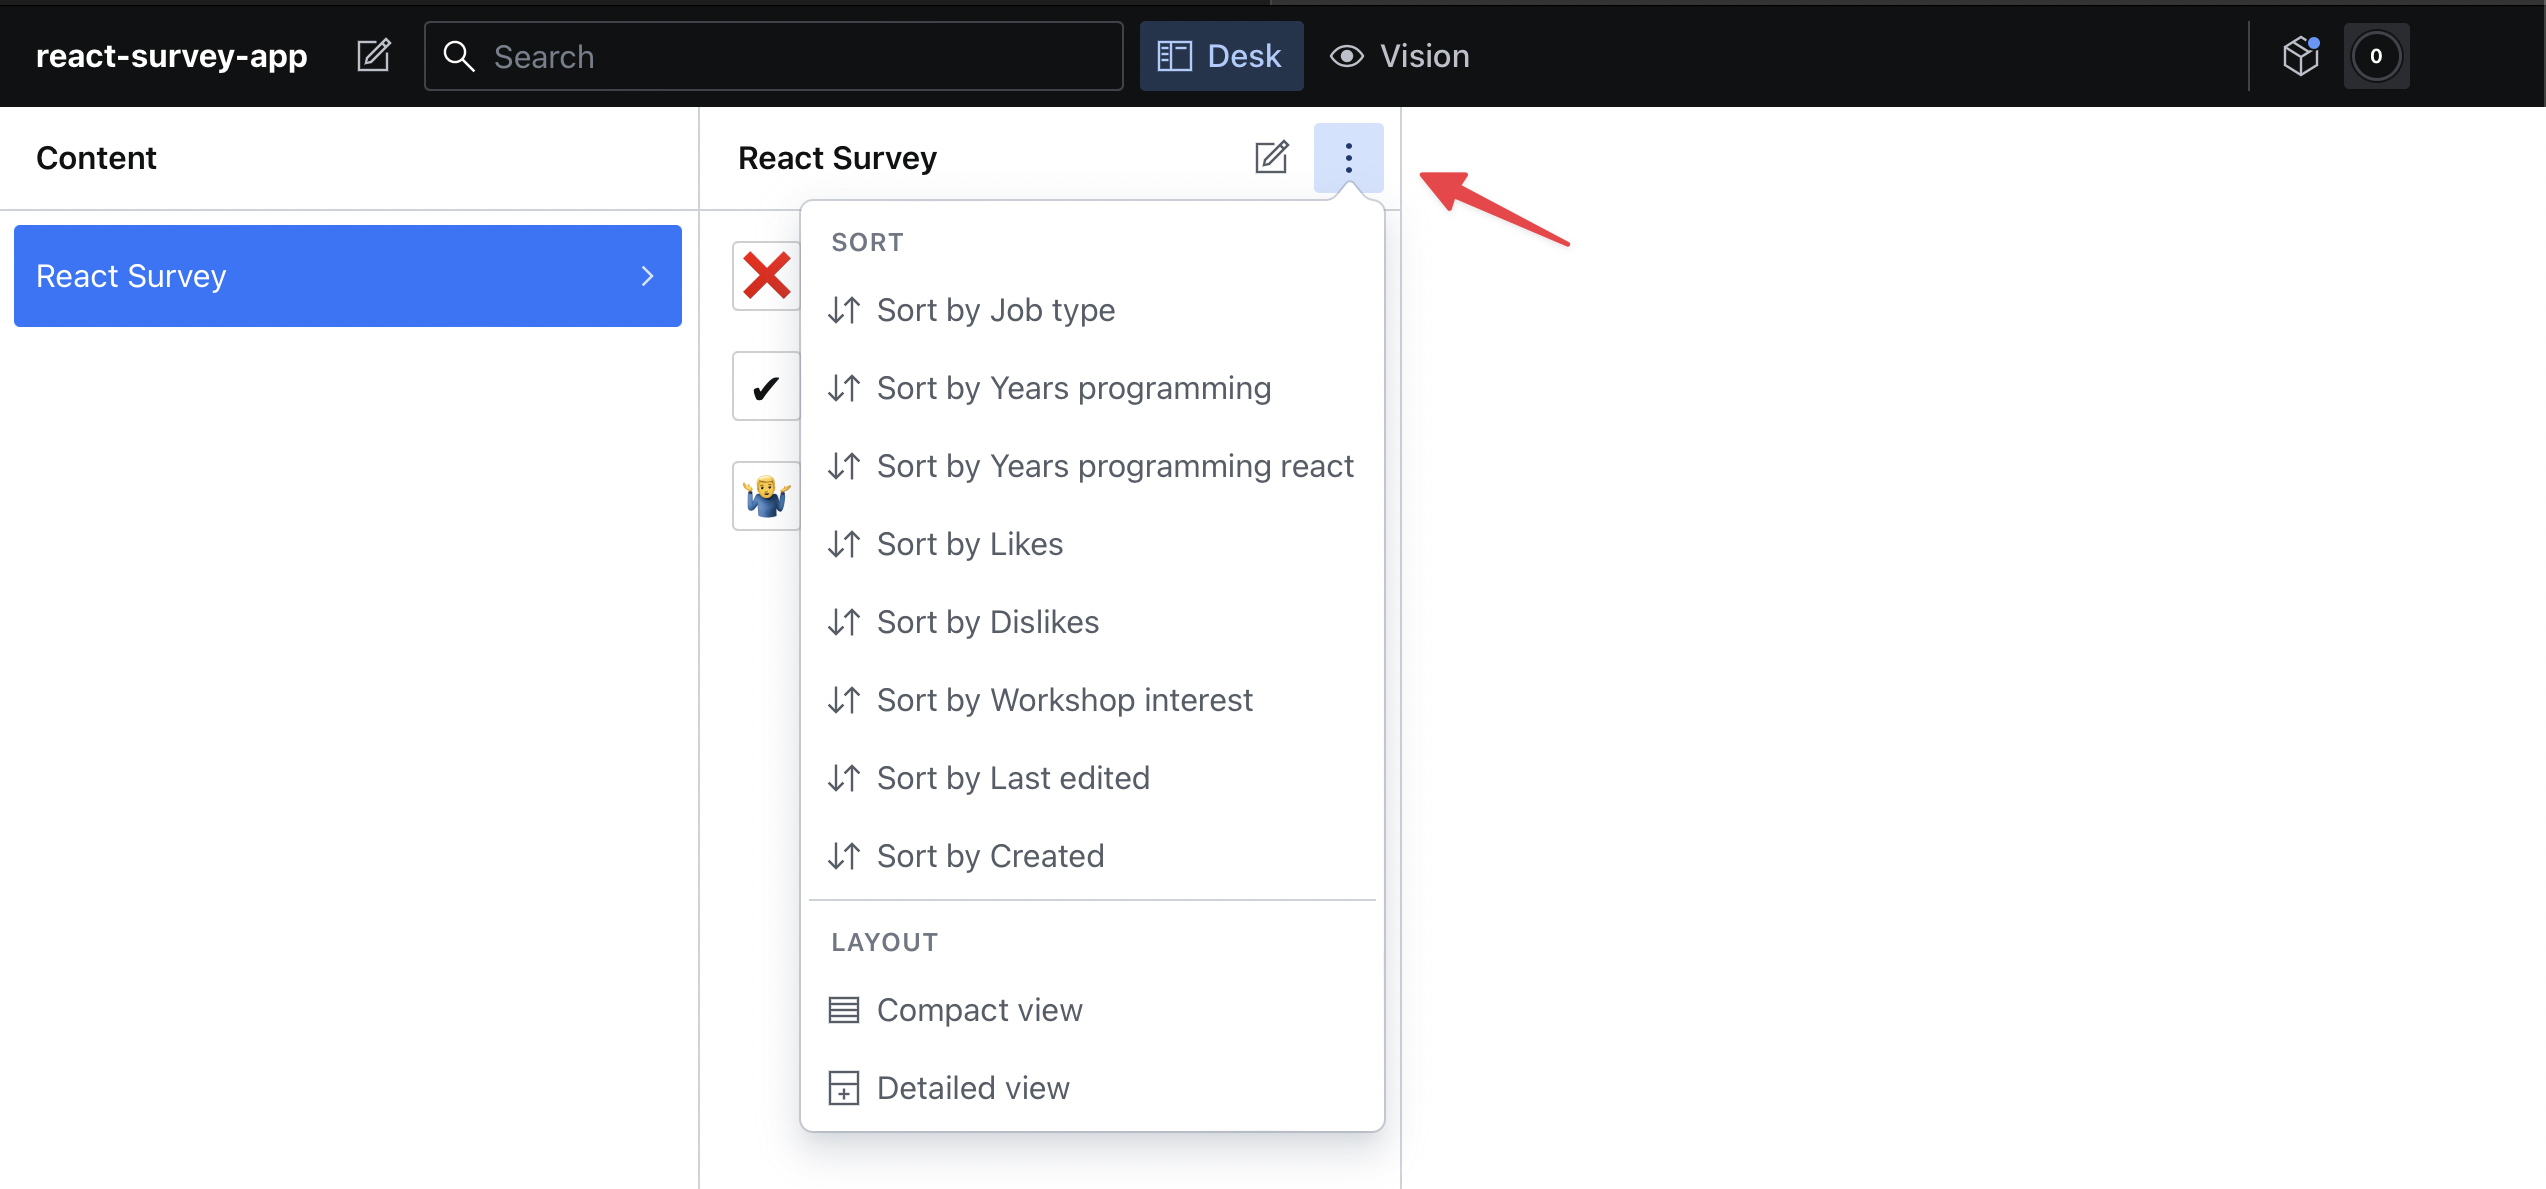
The preview object is used to determine what's displayed in the Sanity Studio list view. If you don't add the preview object, Sanity guesses which fields should be used for the preview and displays them. Inside of this object, we use the select property to get data from our schema. This data is then passed to the prepare method, which returns the title and subtitle and media for our preview. The media property is used to show a thumbnail image in the preview. You can also use JSX to render the thumbnail. We use JSX to render an emoji based on the workshopInterest value of the survey submission.
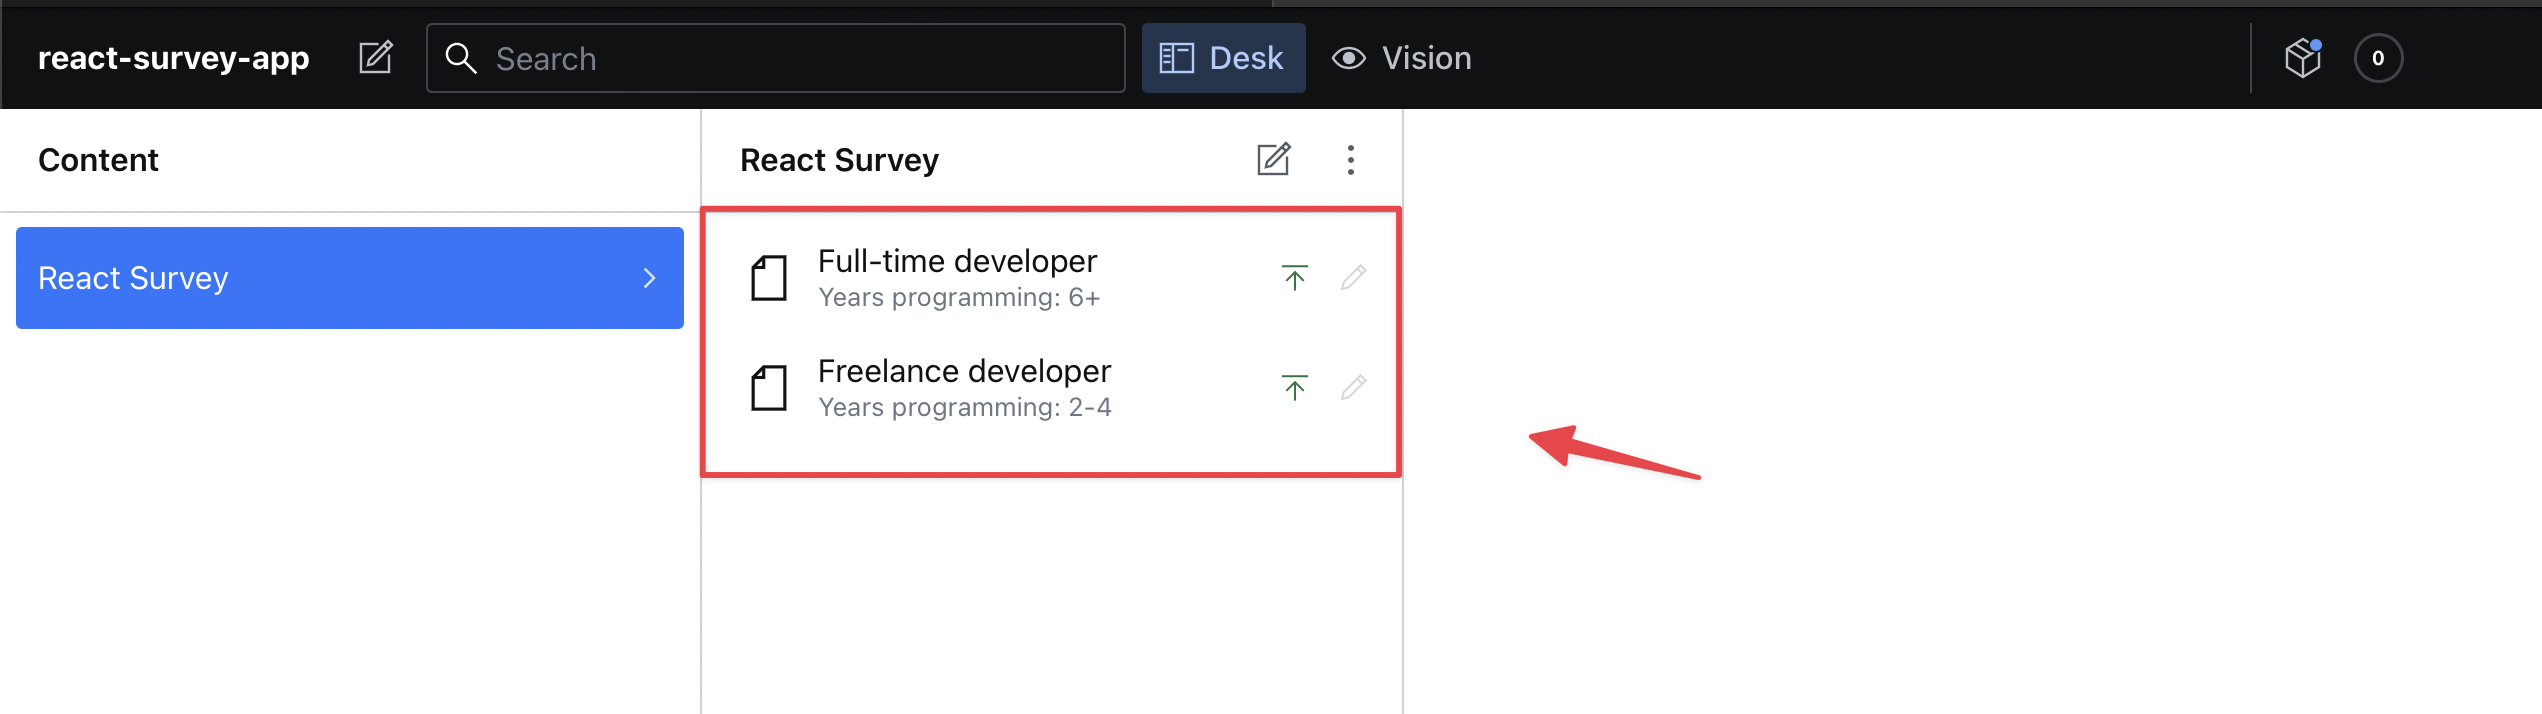
Now the Sanity Studio list preview is much more useful:
You can also sort the list by clicking the three-dot menu in the top-right corner of the list view and selecting a sort type:
Our survey app is done! Before we deploy our app, let's learn how to query data in Sanity's data store using the query language, GROQ (Graph-Relational Object Queries). This will be useful to query all or part of the data as well as to delete data in bulk.
Deleting Sanity data in bulk
The studio folder contains a script to delete all of the survey data in the Sanity data store. To use it run:
sanity exec deleteDocsByFilter.js --with-user-token
You can also have more specific GROQ filters by changing the query in the script, you can refer to the GROQ query cheat sheet for more information.
Querying Survey data in Sanity using GROQ
You can also query your Sanity data in the Sanity Studio development server:
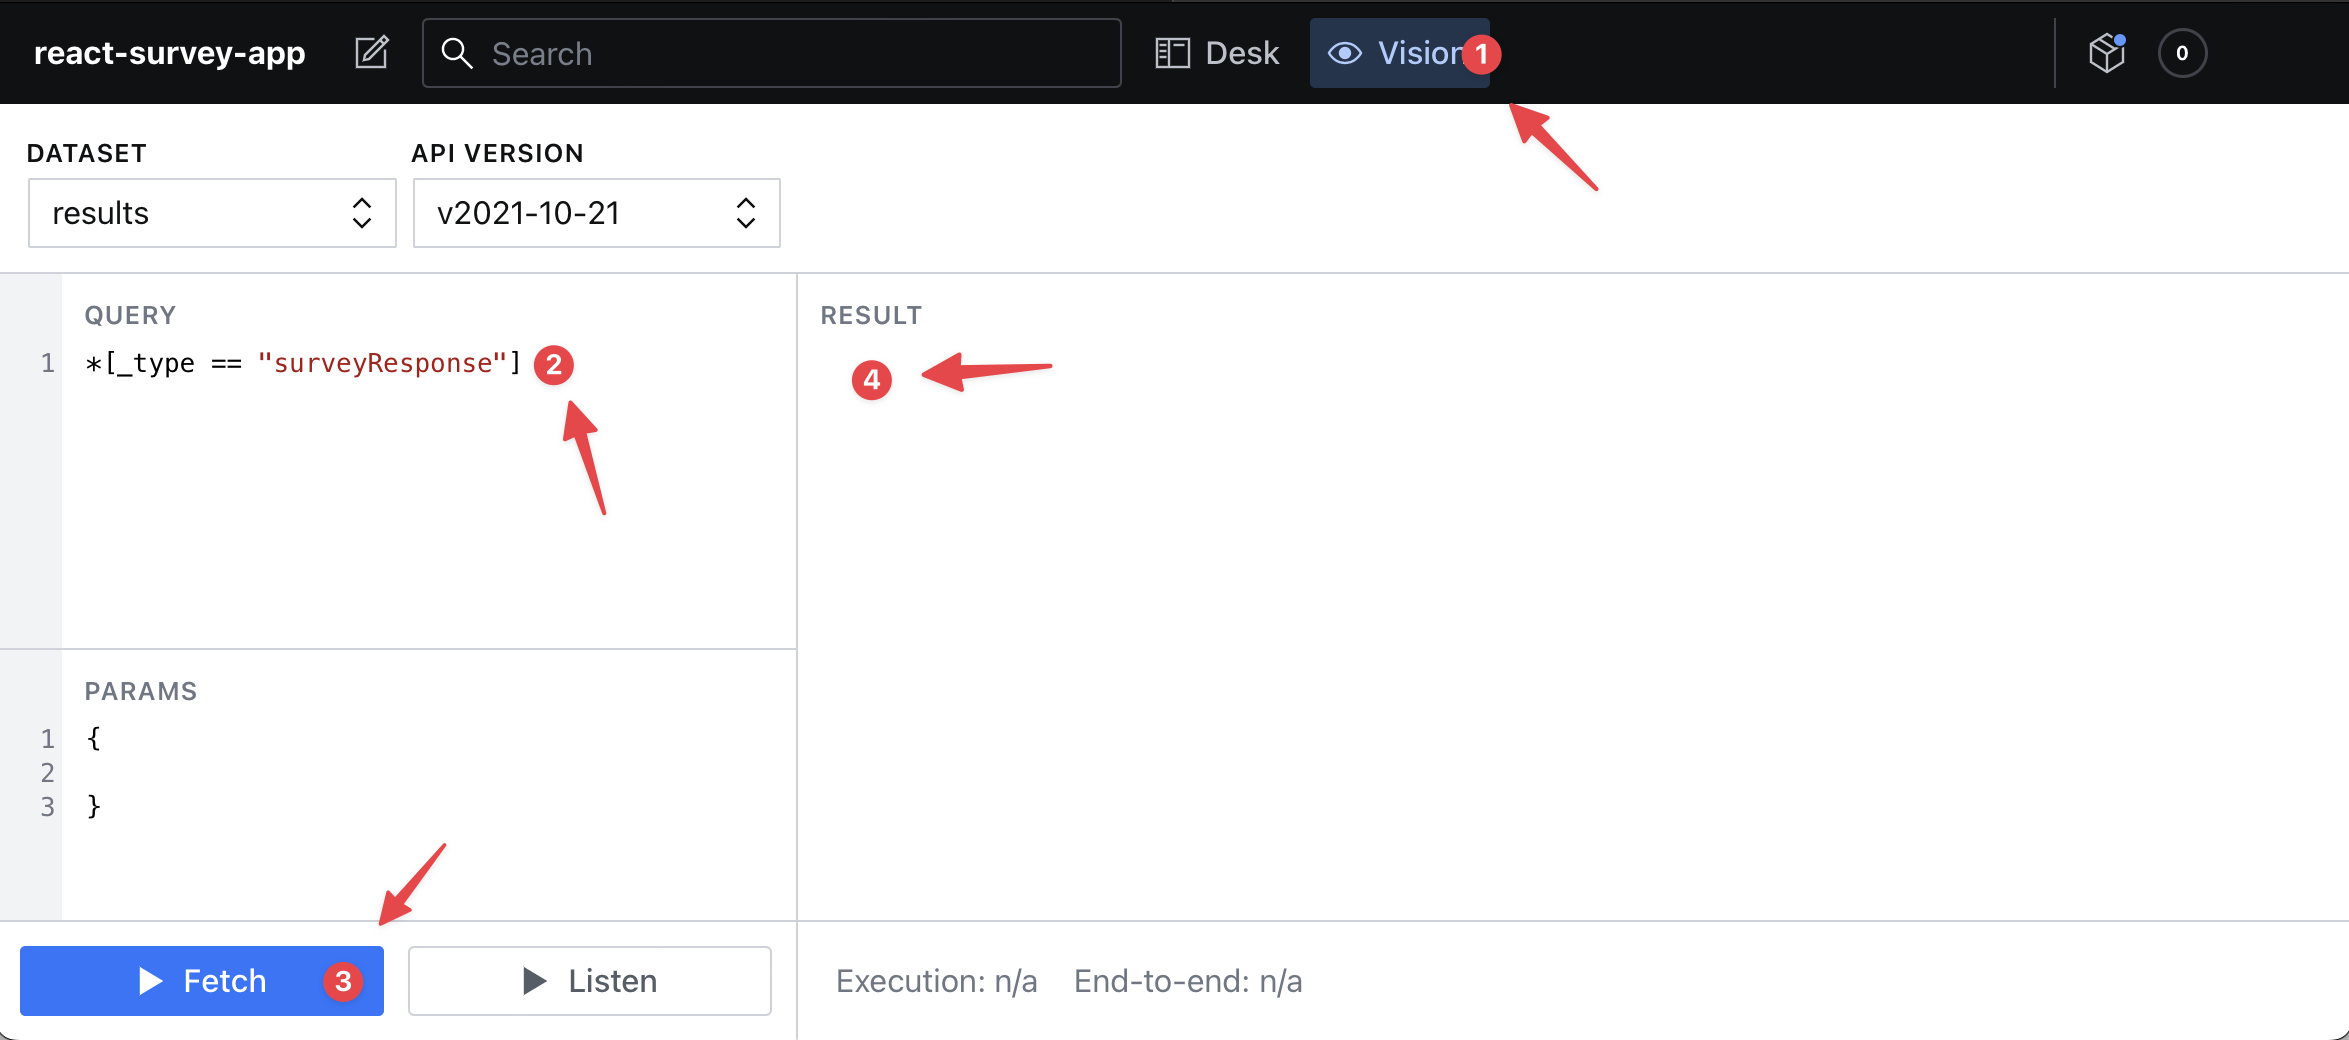
Go to the "Vision" tab at the top (1) and then enter your GROQ query (2). Enter the following query in the "QUERY" input:
*[_type == "surveyResponse"]
Then press the "Fetch" button (3). The JSON response will be displayed in the "RESULT" section (4). If you hover over the response text, a "Copy to clipboard" icon will pop up. If you click it, the results will be copied to your clipboard. You can also query this data by using an HTTP request. This can be used to export all documents with one request or pull the data into an admin dashboard, for example.
Deploying our Sanity Studio
We'll host our Sanity Studio on Sanity. To build and deploy your Studio, run the following command in your terminal:
sanity deploy
You'll then get a message in your terminal that asks you to provide a unique name for your Sanity URL, which will be hosted at https://my-unique-name.sanity.studio. Once the build and deployment steps are complete, you'll get a success message with a link to your deployed Sanity Studio.
You can manage your studio by going to https://www.sanity.io/manage where you can do all sorts of things including monitoring usage and adding project members with different levels of access to the data.
Deploying our Next.js application
Push your whole completed React survey app project, including the web and studio folder, to a GitHub repository on your personal GitHub account if you haven't done so already. The repository can be public or private. This will make deployment easier.
First, create a Vercel account. Choose "Continue with GitHub" and go through the sign-up process. Now import your GitHub repository on Vercel, you can do this from here. You’ll see that you need to install Vercel for GitHub. You can give it access to all of your repositories or just to repositories that you select.
Once you have given Vercel permission to access your React survey app GitHub repository, click the "Import Button". You'll then be taken to a page to configure your project. For the "FRAMEWORK PRESET" select "Next.js". If we only had a Next.js repo, Vercel would automatically detect this. Set the "ROOT DIRECTORY" to "web".
You don't need to change the "Build and Output Settings". Vercel adds default values used for a typical Next.js project.
Add the environmental variables from the .env.local file to the "Environment Variables" section. Now click the "Deploy" button to deploy your Next.js app. Once deployment is complete, go to the live URL and submit a survey response. You'll see it in your Sanity Studio.
Next steps
One major issue with our survey form is that users can submit as many responses as they want to. A user could spam our survey with many responses by using browser automation tools such as Selenium. You minimize this by:
- Adding Google's invisible reCAPTCHA to the form.
- Rate limiting form submissions by IP address using a library such as rate-limiter-flexible
Another thing that you could do to improve the survey app is to pull data from Sanity into an admin dashboard in Next.js to visualize the survey data. You can create tables, graphs and other data visualizations to understand the data better by using a library such as React Charts.