If you’ve ever written code, you probably know that:
You might not have tried out advanced code search tools like Sourcegraph because getting started looks like too much effort.
The Sourcegraph “Getting Started” page already has a ton of information about different ways to start using Sourcegraph, but here we’ll go through an opinionated set up guide.
Specifically, we’ll:
This is a tradeoff between running Sourcegraph locally on your dev machine (where features would be limited), and installing it to a cluster (where set up would take longer).
At the end of this guide, you’ll have your own Sourcegraph server set up on a custom domain like sg.example.com. It will periodically fetch any repositories you are interested in from GitHub (private, public, or from your entire GitHub org) and update its index so that you have these at your fingertips.
You’ll be able to search through all your code using advanced syntax and better defaults.
To follow along, you should:
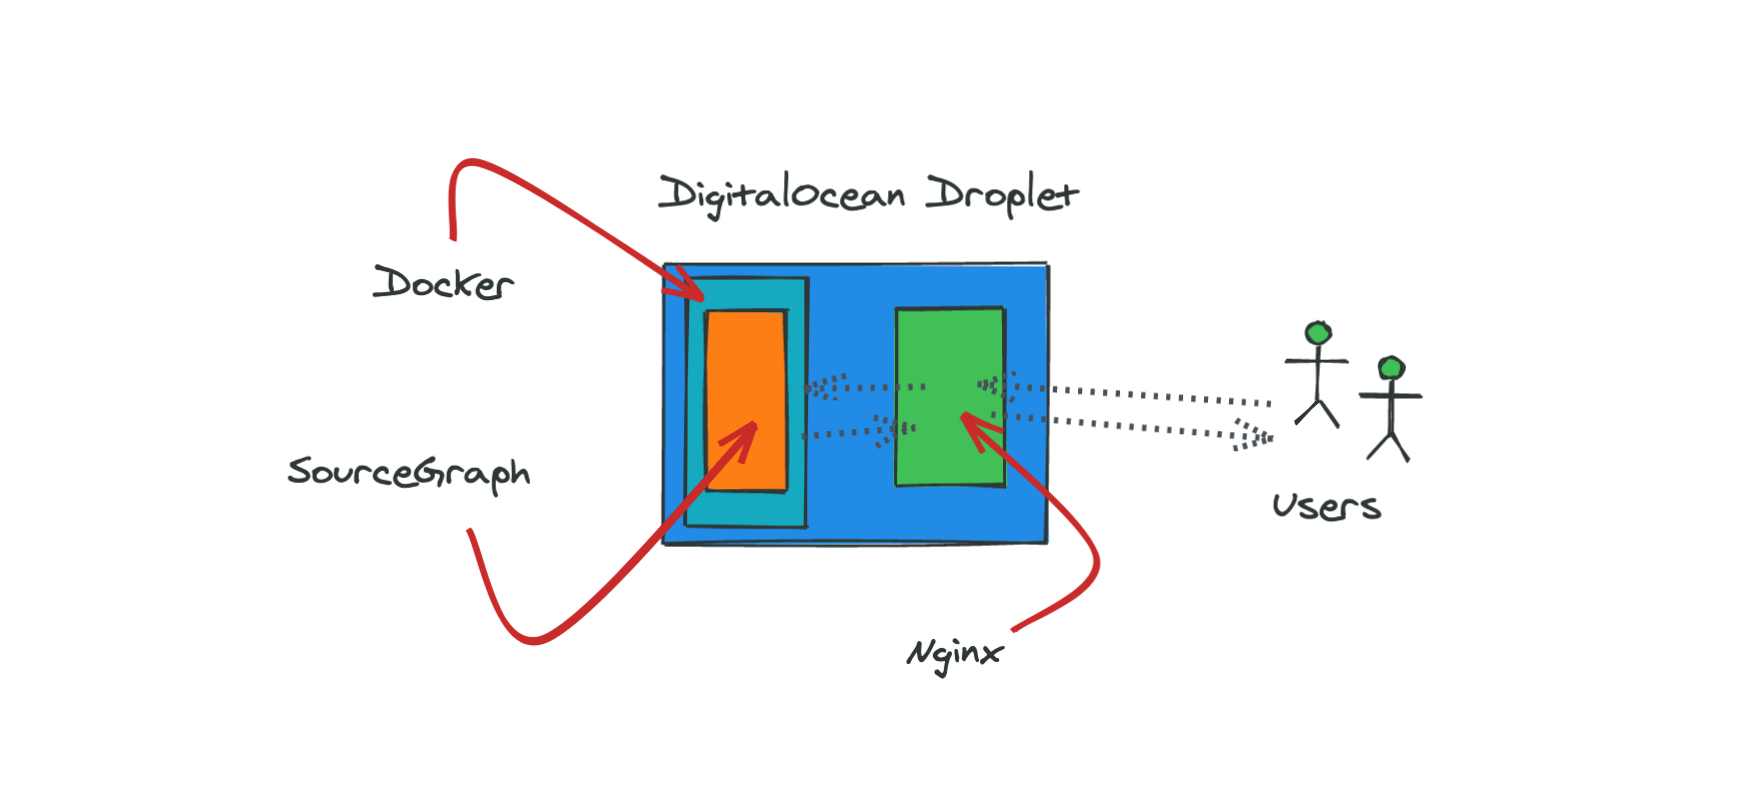
First, we need to set up a VPS running Ubuntu 18.04. On this, we’ll install Docker and pull the Sourcegraph Docker image.
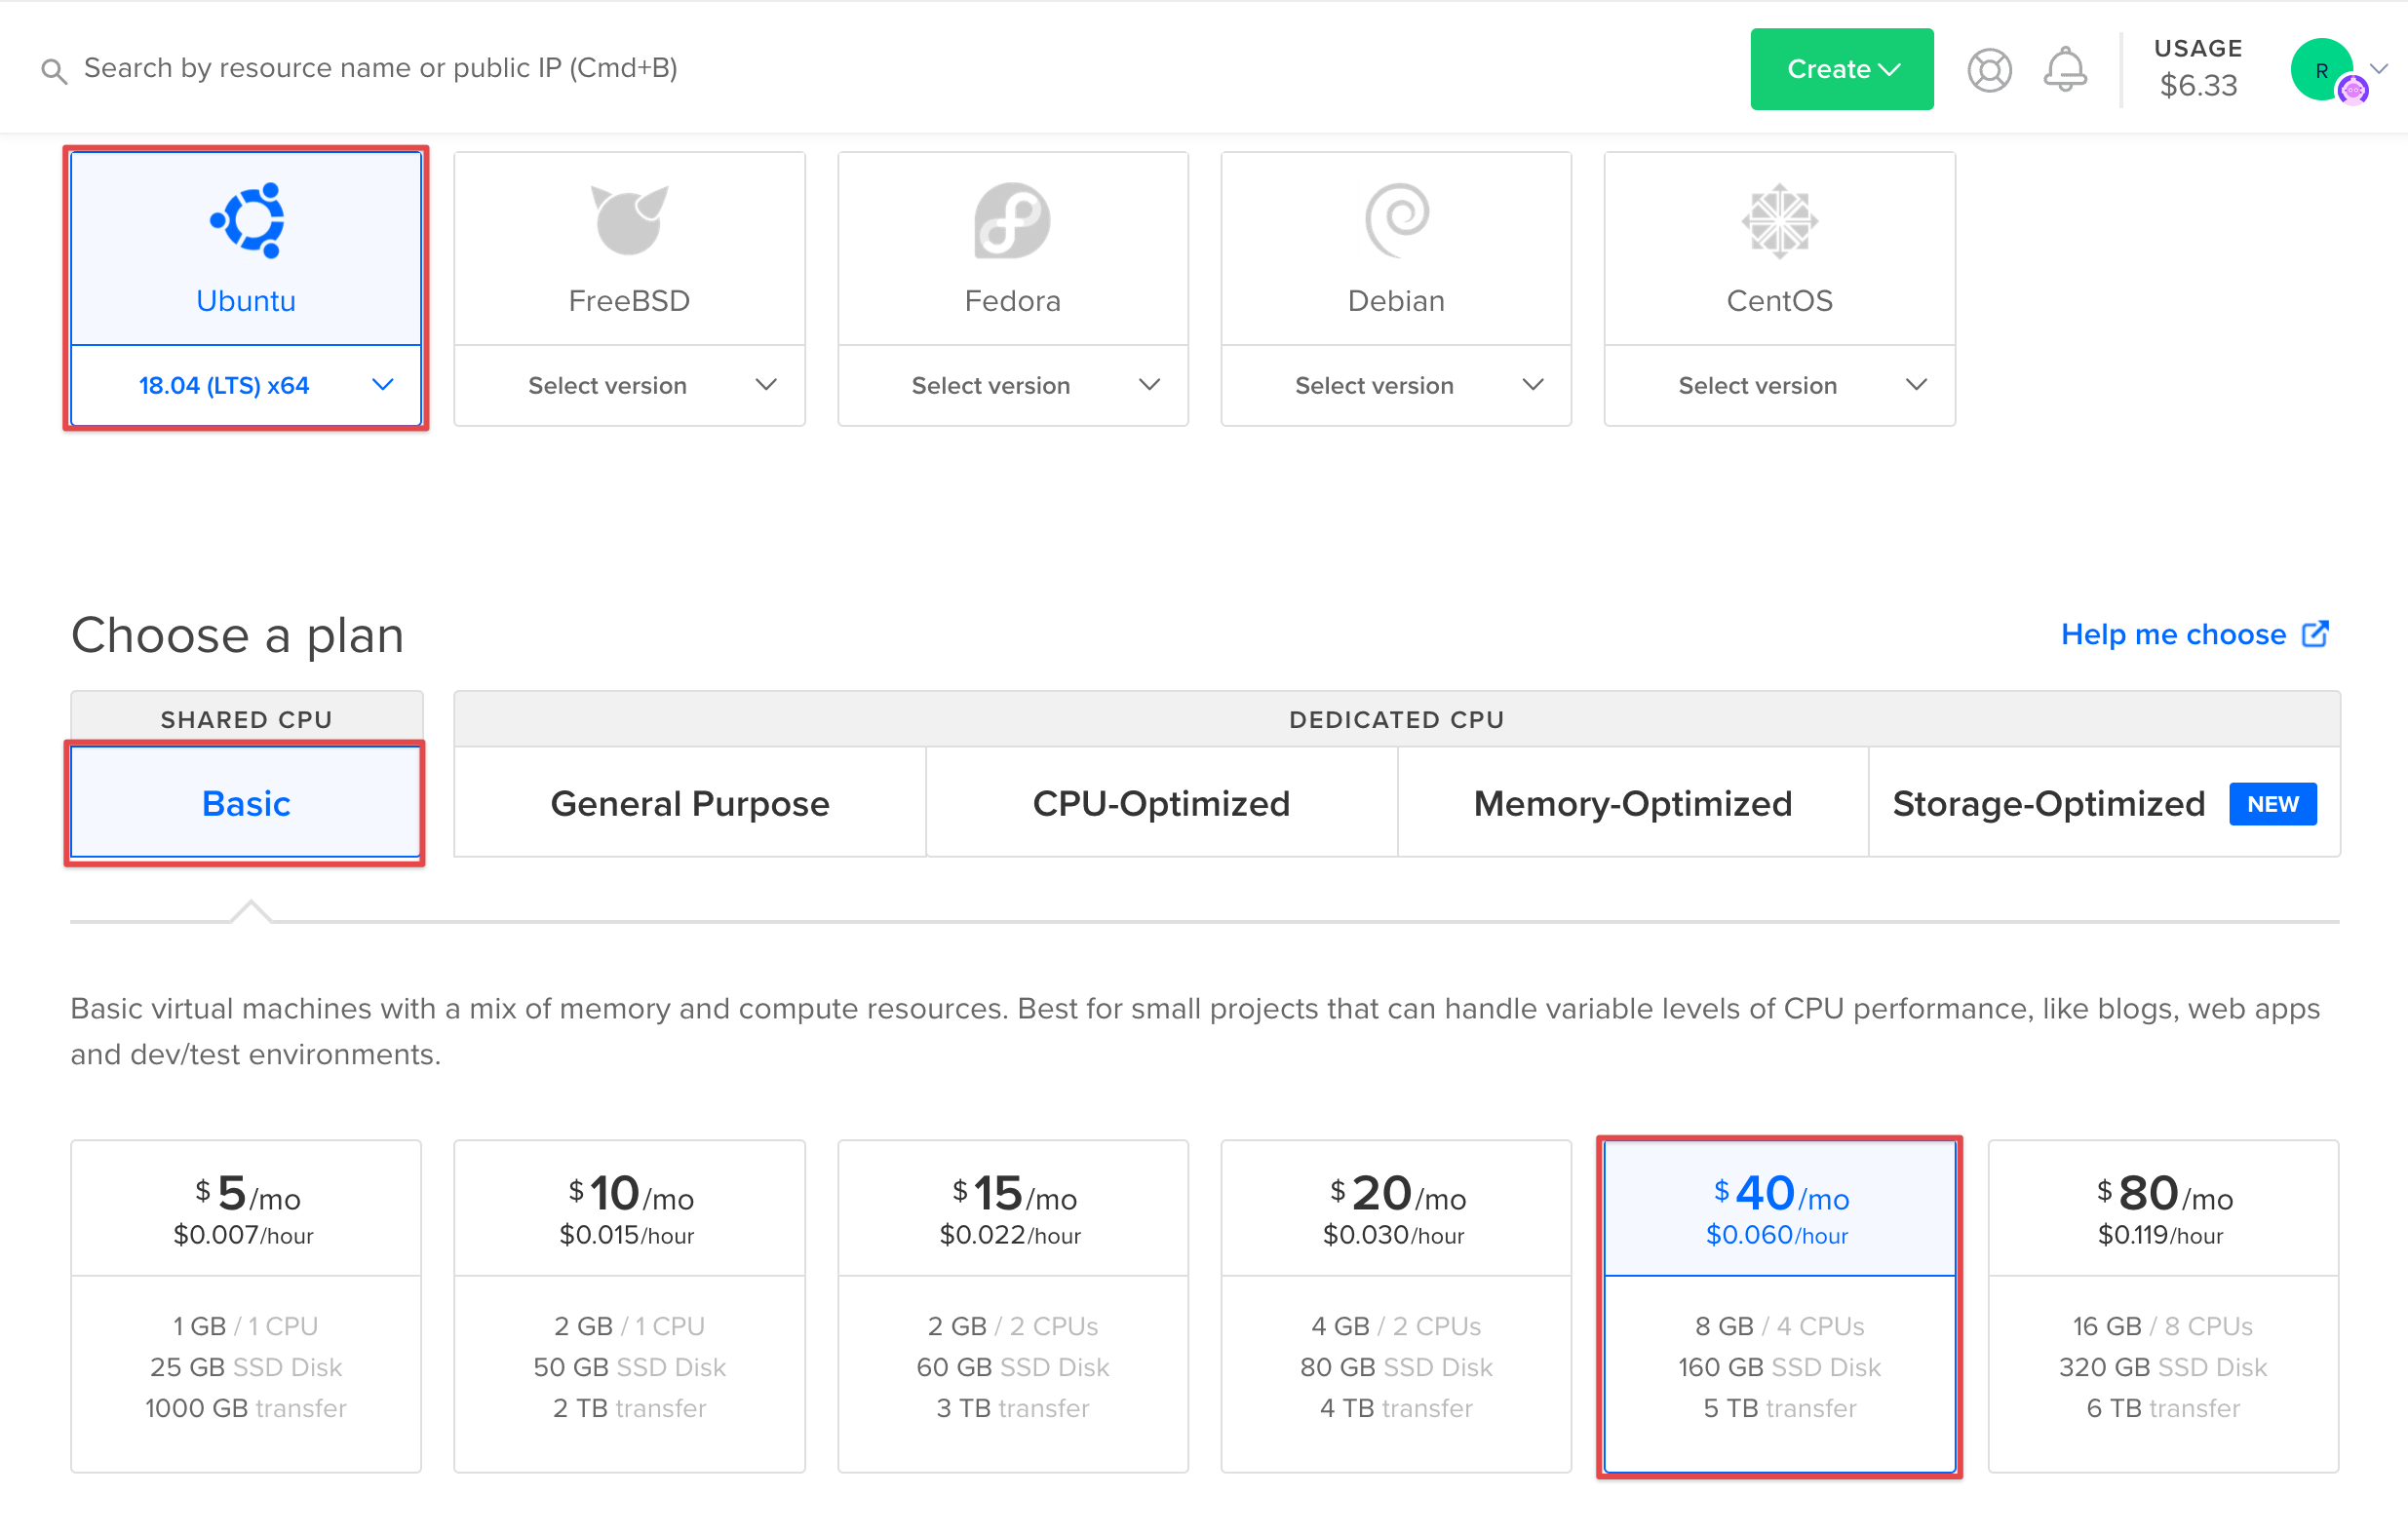
Choose Ubuntu 18.04 (20.04 has some issues installing Docker) and a droplet with enough disk space. Here we chose one that costs $40/month – but choose a smaller one if you know you only have a few repositories.
Further down, select a region that is close to you, set up an SSH key and give your server a friendly name like sourcegraph-server.
Finally, click “Create” and wait a few seconds until you get your IP address and can connect to the server.
We’re going to just use the default root user which has some security implications but as we are not going to use this server for anything except Sourcegraph, these are not major. If you prefer to set everything up as a non-root user, you’ll need to prefix most of the Linux commands with sudo.
Connect to your instance with SSH, substituting the IP address you got from DigitalOcean.
ssh root@68.183.10.58Install Docker by running:
snap install dockerOpen a Tmux pane (where we’ll leave Sourcegraph running) by typing tmux.
Now pull the Sourcegraph Docker container by running (check for an updated version of this command at https://about.sourcegraph.com/get-started).
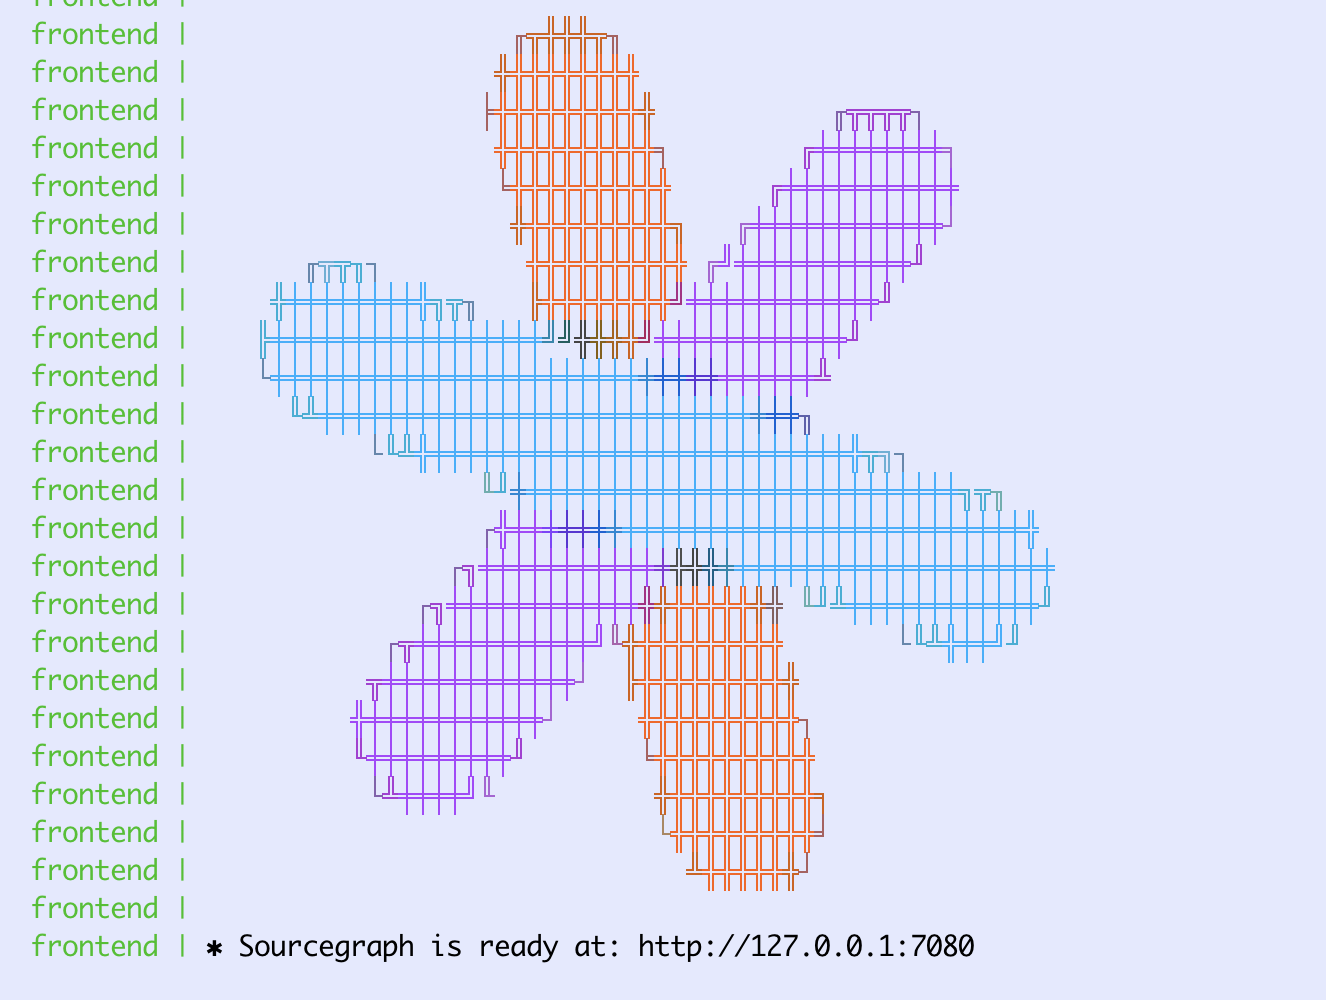
docker run --publish 7080:7080 --publish 127.0.0.1:3370:3370 --rm --volume ~/.sourcegraph/config:/etc/sourcegraph --volume ~/.sourcegraph/data:/var/opt/sourcegraph sourcegraph/server:3.24.1It will take half a minute or so to pull the dependencies and initialise Sourcegraph and then you’ll see Sourcegraph running on port 7080.
Press Ctrl-B and then tap d to detach the Tmux session. This will leave Sourcegraph running in the background even after you close the SSH sessions.
If you want to test it out at this stage, open a new SSH connection to your server along with a local portforward (substituting your DigitalOcean IP address again)
ssh -L 7080:localhost:7080 root@68.183.10.58This will forward your local port 7080 through SSH to connect to localhost:7080 on the DigitalOcean instance where Sourcegraph is running. On your local machine, you can now visit http://localhost:7080 in your browser and you should see the Sourcegraph welcome page.
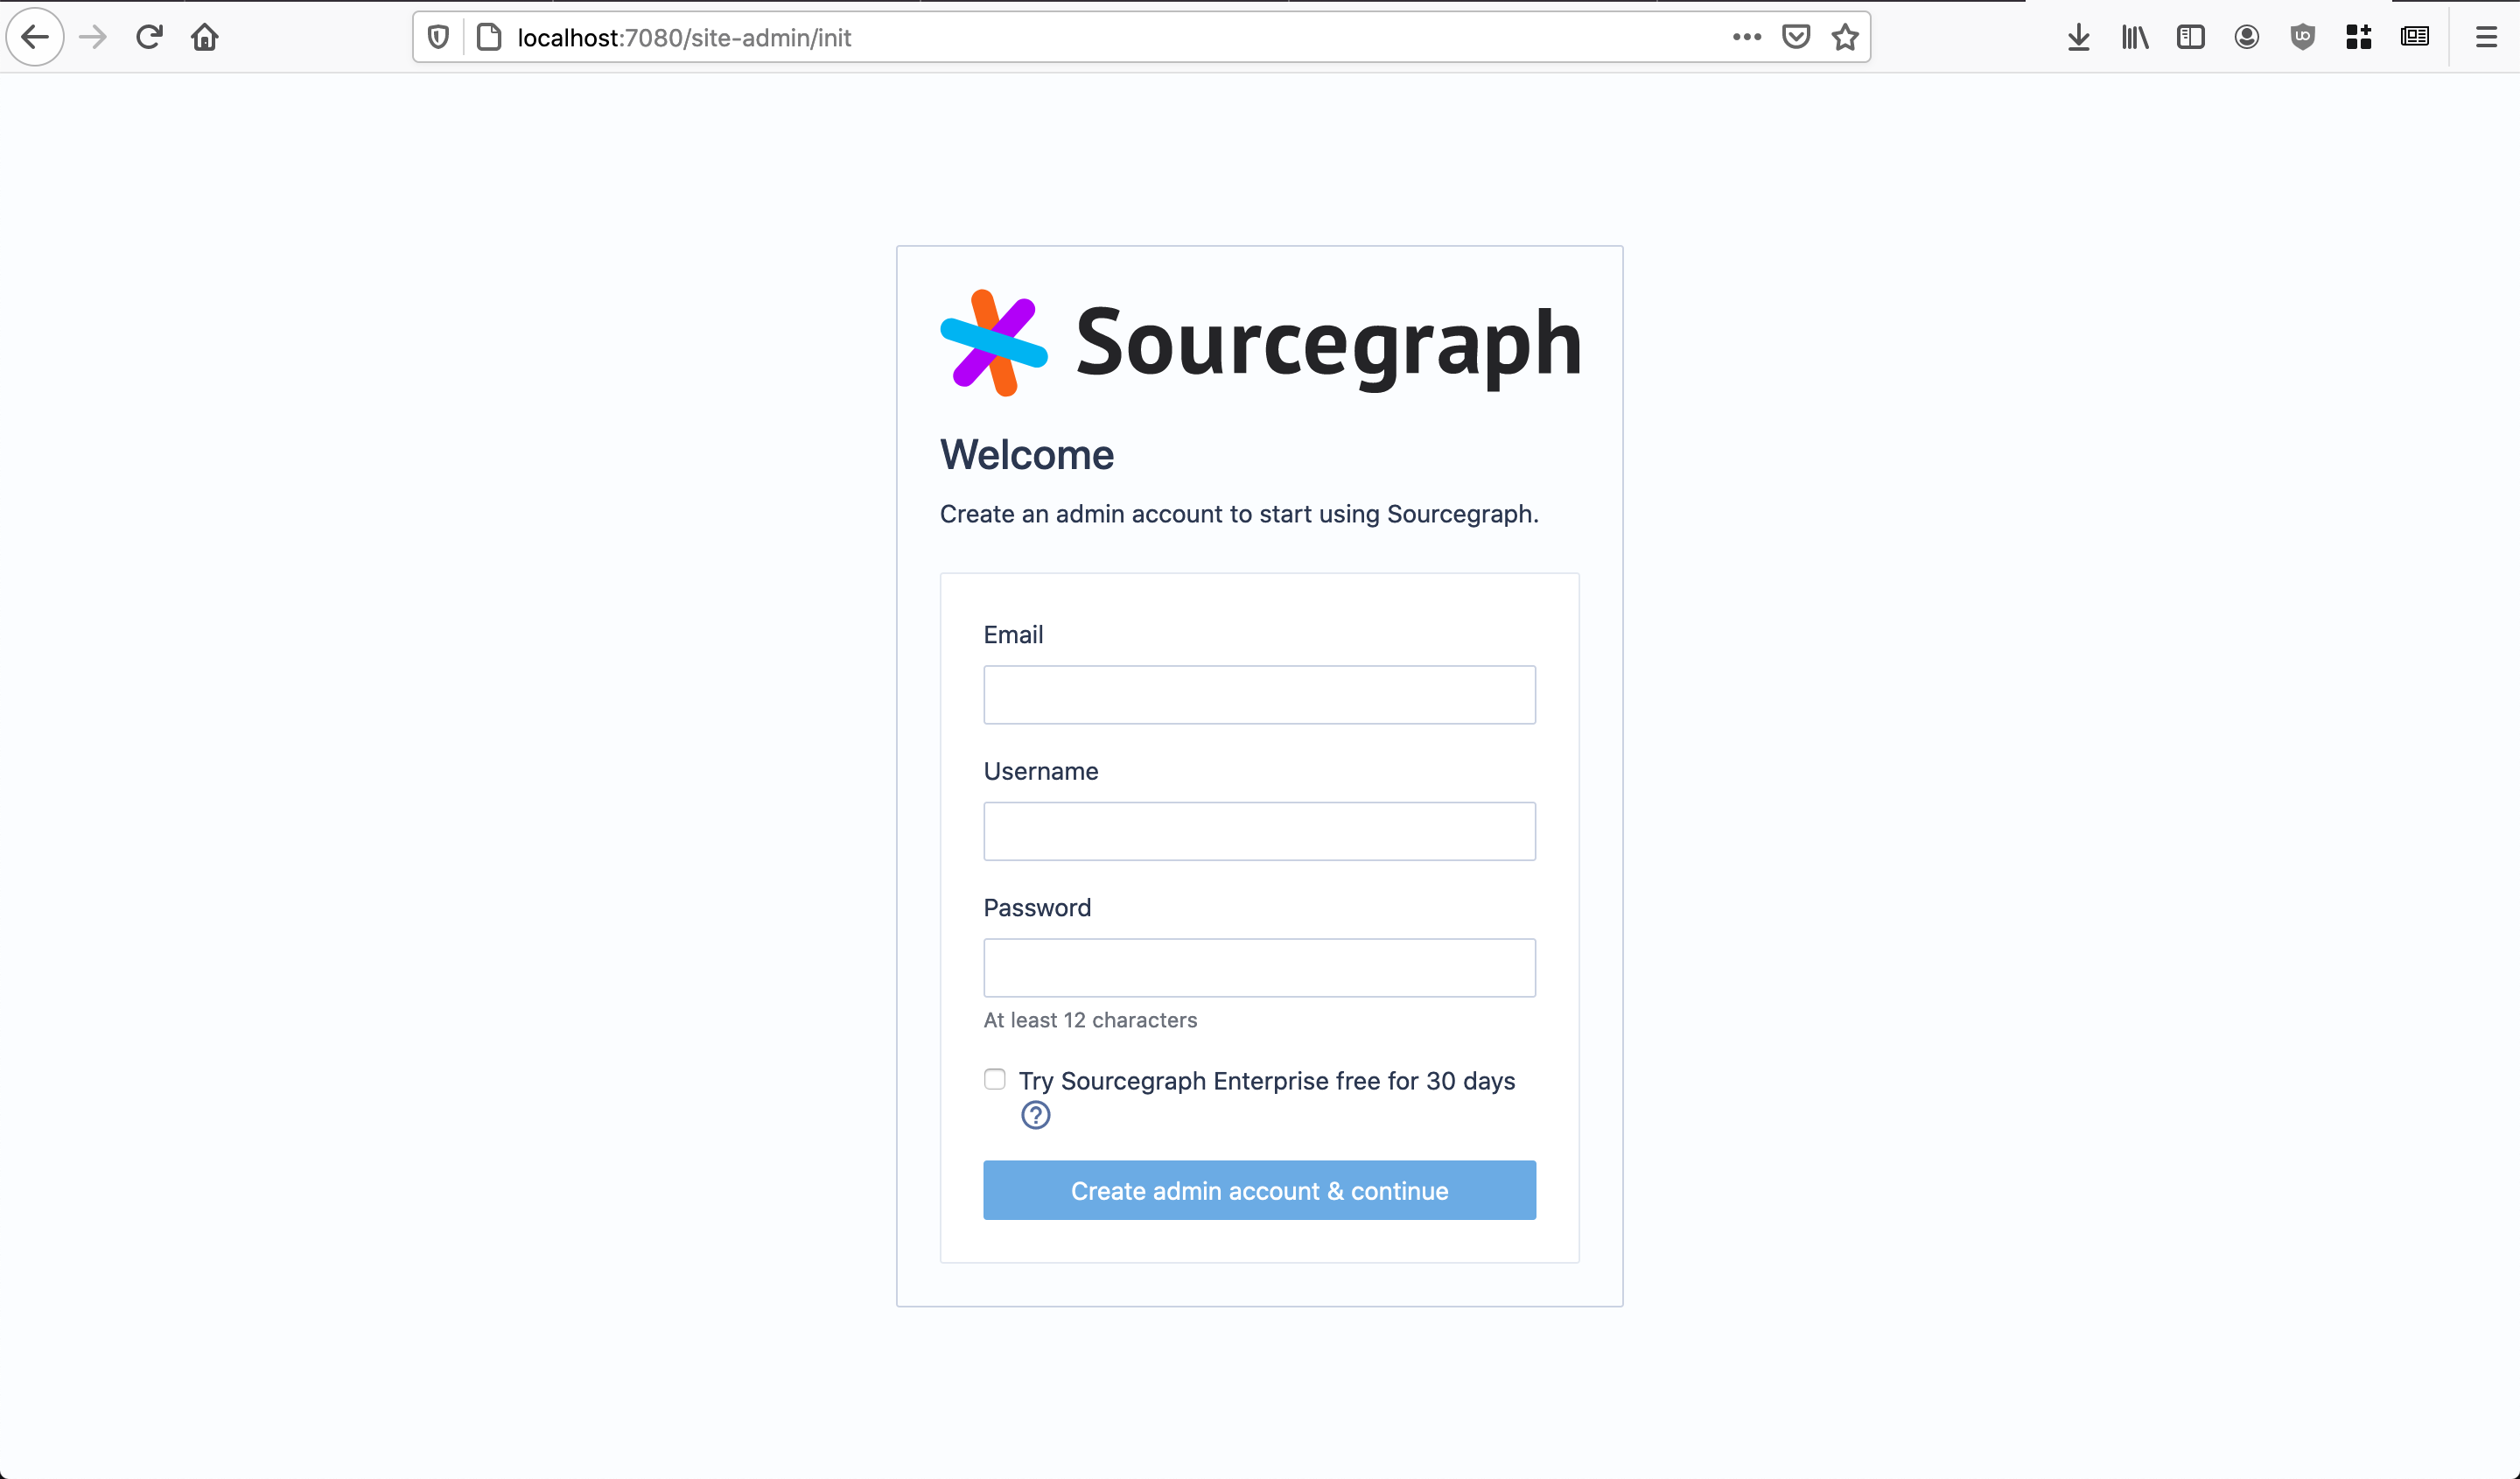
Don’t sign up yet – let’s first set up a proper connection using a custom domain and SSL.
We could access our server by typing in the IP address, but it’s hard to remember and we can’t easily get an SSL certificate to access our code securely over HTTPS this way.
Instead, we’ll point a subdomain of a domain we control – e.g. sg.example.com at the DigitalOcean droplet so that we can access the Sourcegraph server by visiting this domain.
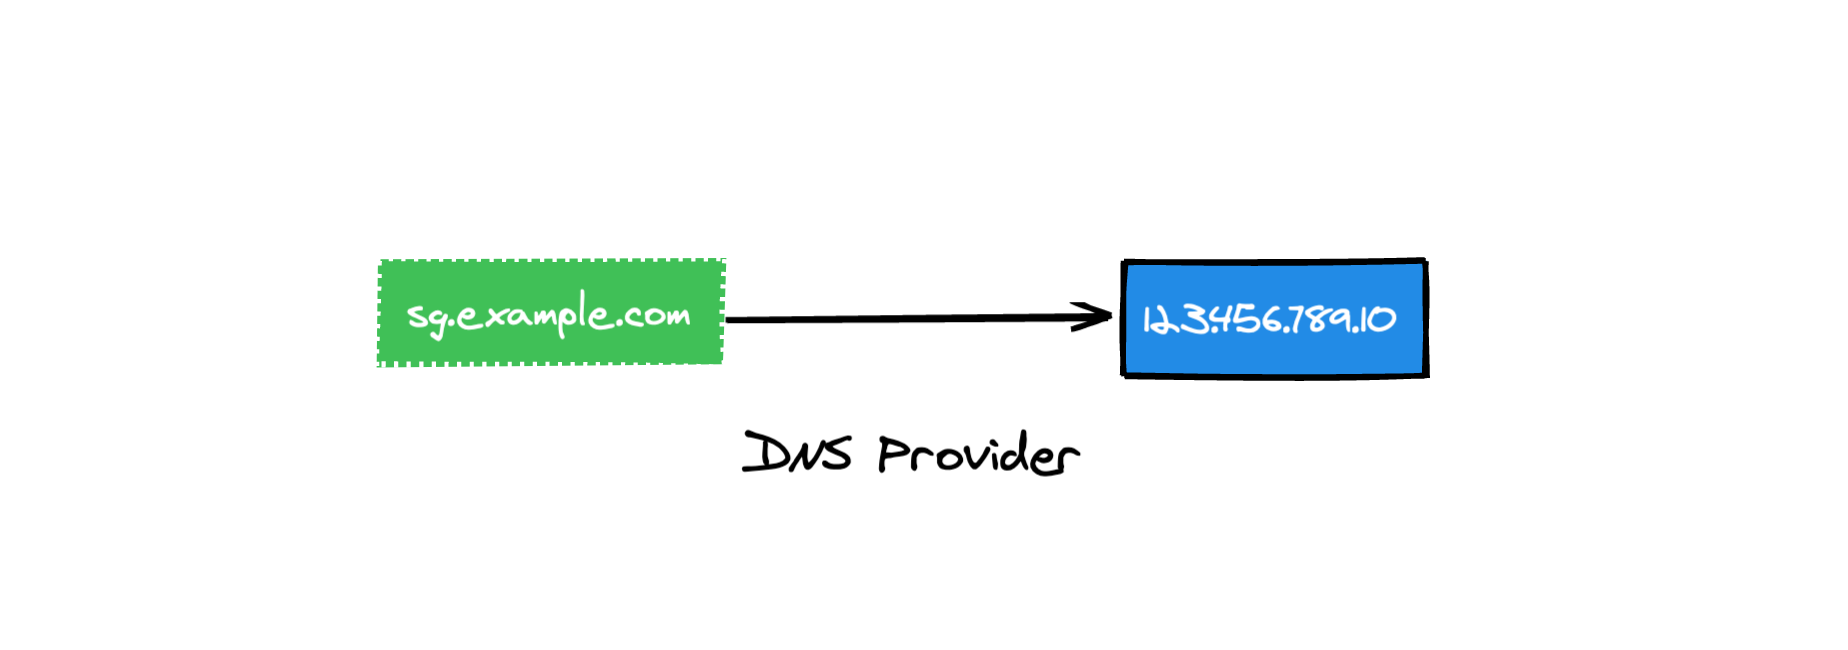
In your DNS control panel, add an “A” record that points a subdomain to the IP address (the same one you used to connect to your VPS via SSH).
In NameCheap, this looks as follows, but this will change depending on your domain registrar or DNS provider:
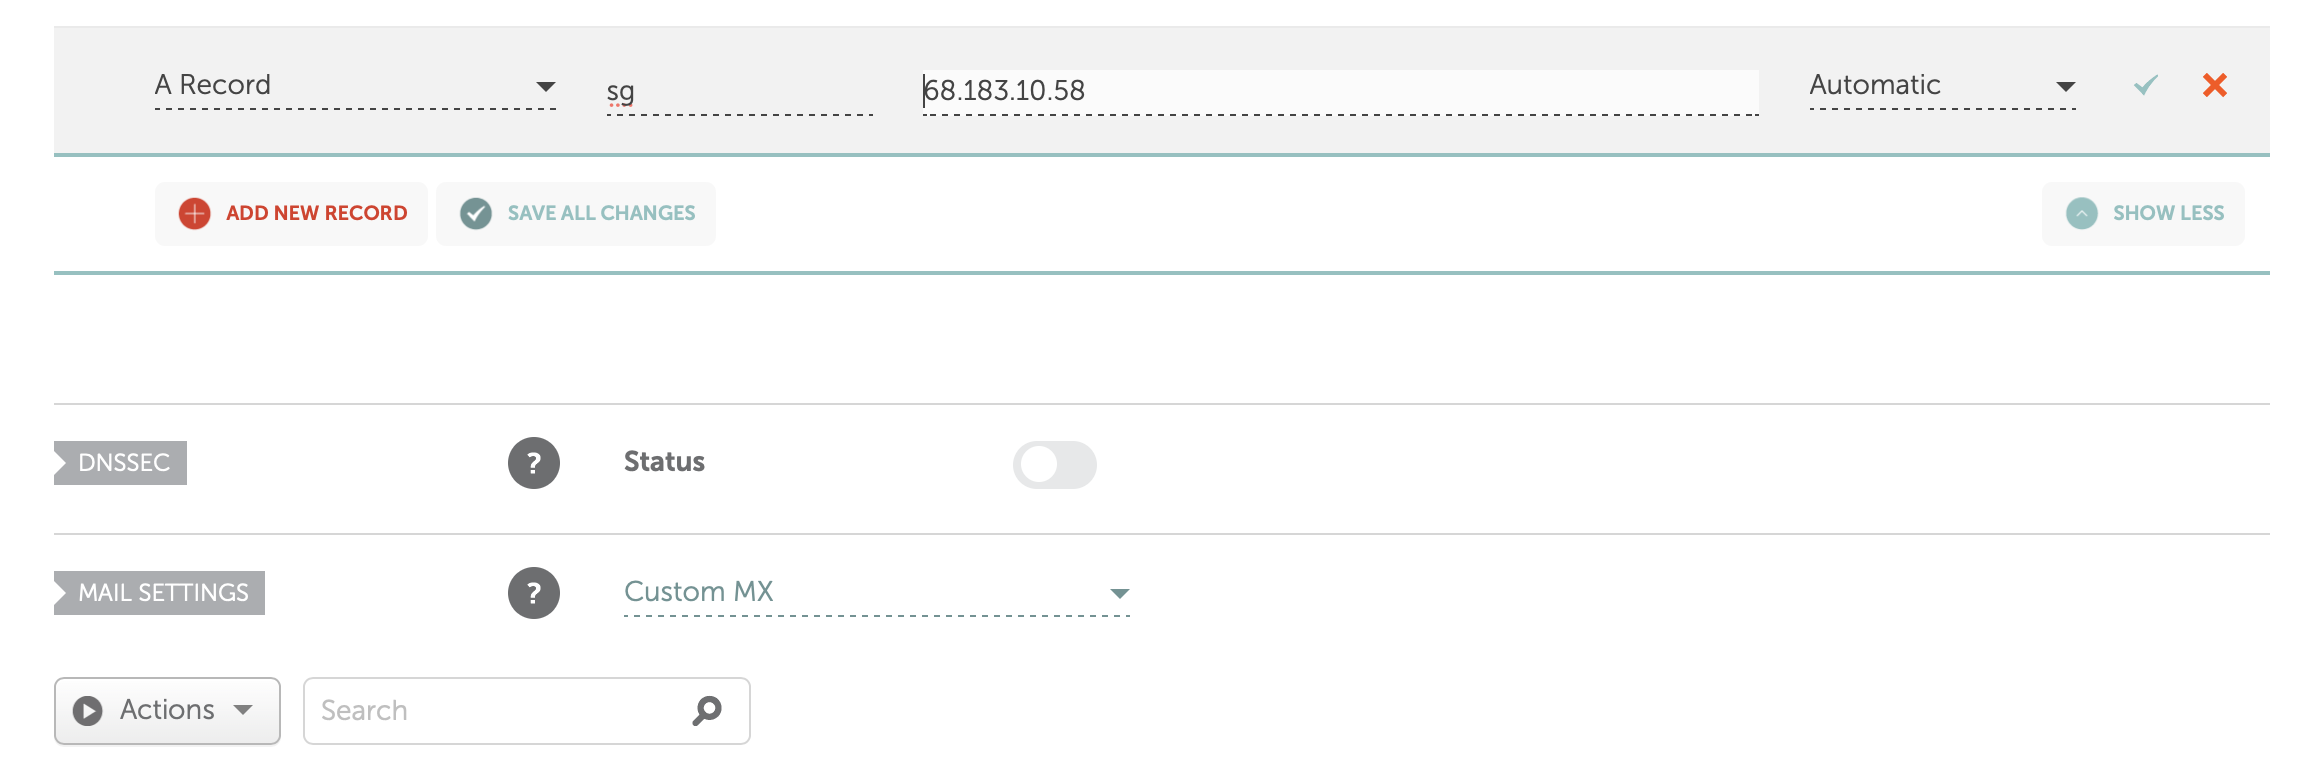
Save the changes and wait for the DNS record to propagate. This can take up to 72 hours, but in practice usually takes less than 5 minutes.
Instead of having users connect directly to the port opened by Docker, we’re going to set up Nginx as a scalable web server in front of Docker. Nginx will be responsible for responding to all requests from end users and proxying them over to our Docker connection.
apt update && apt install nginxOnce installed, you should be able to visit the subdomain we configured in the previous step sg.example.com and see the Nginx default welcome page.

To configure Nginx as a proxy to the Docker container, we’ll need to edit the file at /etc/nginx/sites-available/default. Open this with Nano (or vim if you prefer) by running:
nano /etc/nginx/sites-available/defaultRemove everything in the file and add the below in its place. Substitute both instances of sg.example.com with the subdomain that you set up in the previous step.
server {
    server_name sg.example.com;

    access_log            /var/log/nginx/sourcegraph.access.log;

    location / {

      proxy_set_header    Host $host;
      proxy_set_header    X-Real-IP $remote_addr;
      proxy_set_header    X-Forwarded-For $proxy_add_x_forwarded_for;
      proxy_set_header    X-Forwarded-Proto $scheme;

      proxy_pass          http://localhost:7080;
      proxy_read_timeout  90;

      proxy_redirect      http://localhost:7080 https://sg.example.com;
    }

    listen 80;
}
This links up the running Docker container with Nginx, meaning that any traffic that comes in on our sg.example.com subdomain will be redirected to the Sourcegraph server running inside Docker.
Save the file and run:
service nginx reloadYou should now be able to see the same Source Welcome page running on http://sg.example.com. Note that the secure version (https) will not work yet, as we still need to set up an SSL certificate.
Install certbot using snap by running the following command:
snap install --classic certbot snap install --classic certbotThen run:
certbotAnd follow the prompts to:
sg.example.com domain.Certbot will automatically modify the Nginx config file that we edited earlier to use https instead of http.
Visit https://sg.example.com and now you can finally fill out the form to sign up for Sourcegraph.
Sourcegraph is very configurable and has many different options. The two most important ones to get started with using it are:
Visit https://sg.ritza.co/site-admin/configuration and uncomment the third line (remove the // at the start). Then replace the domain with the subdomain that we chose earlier.
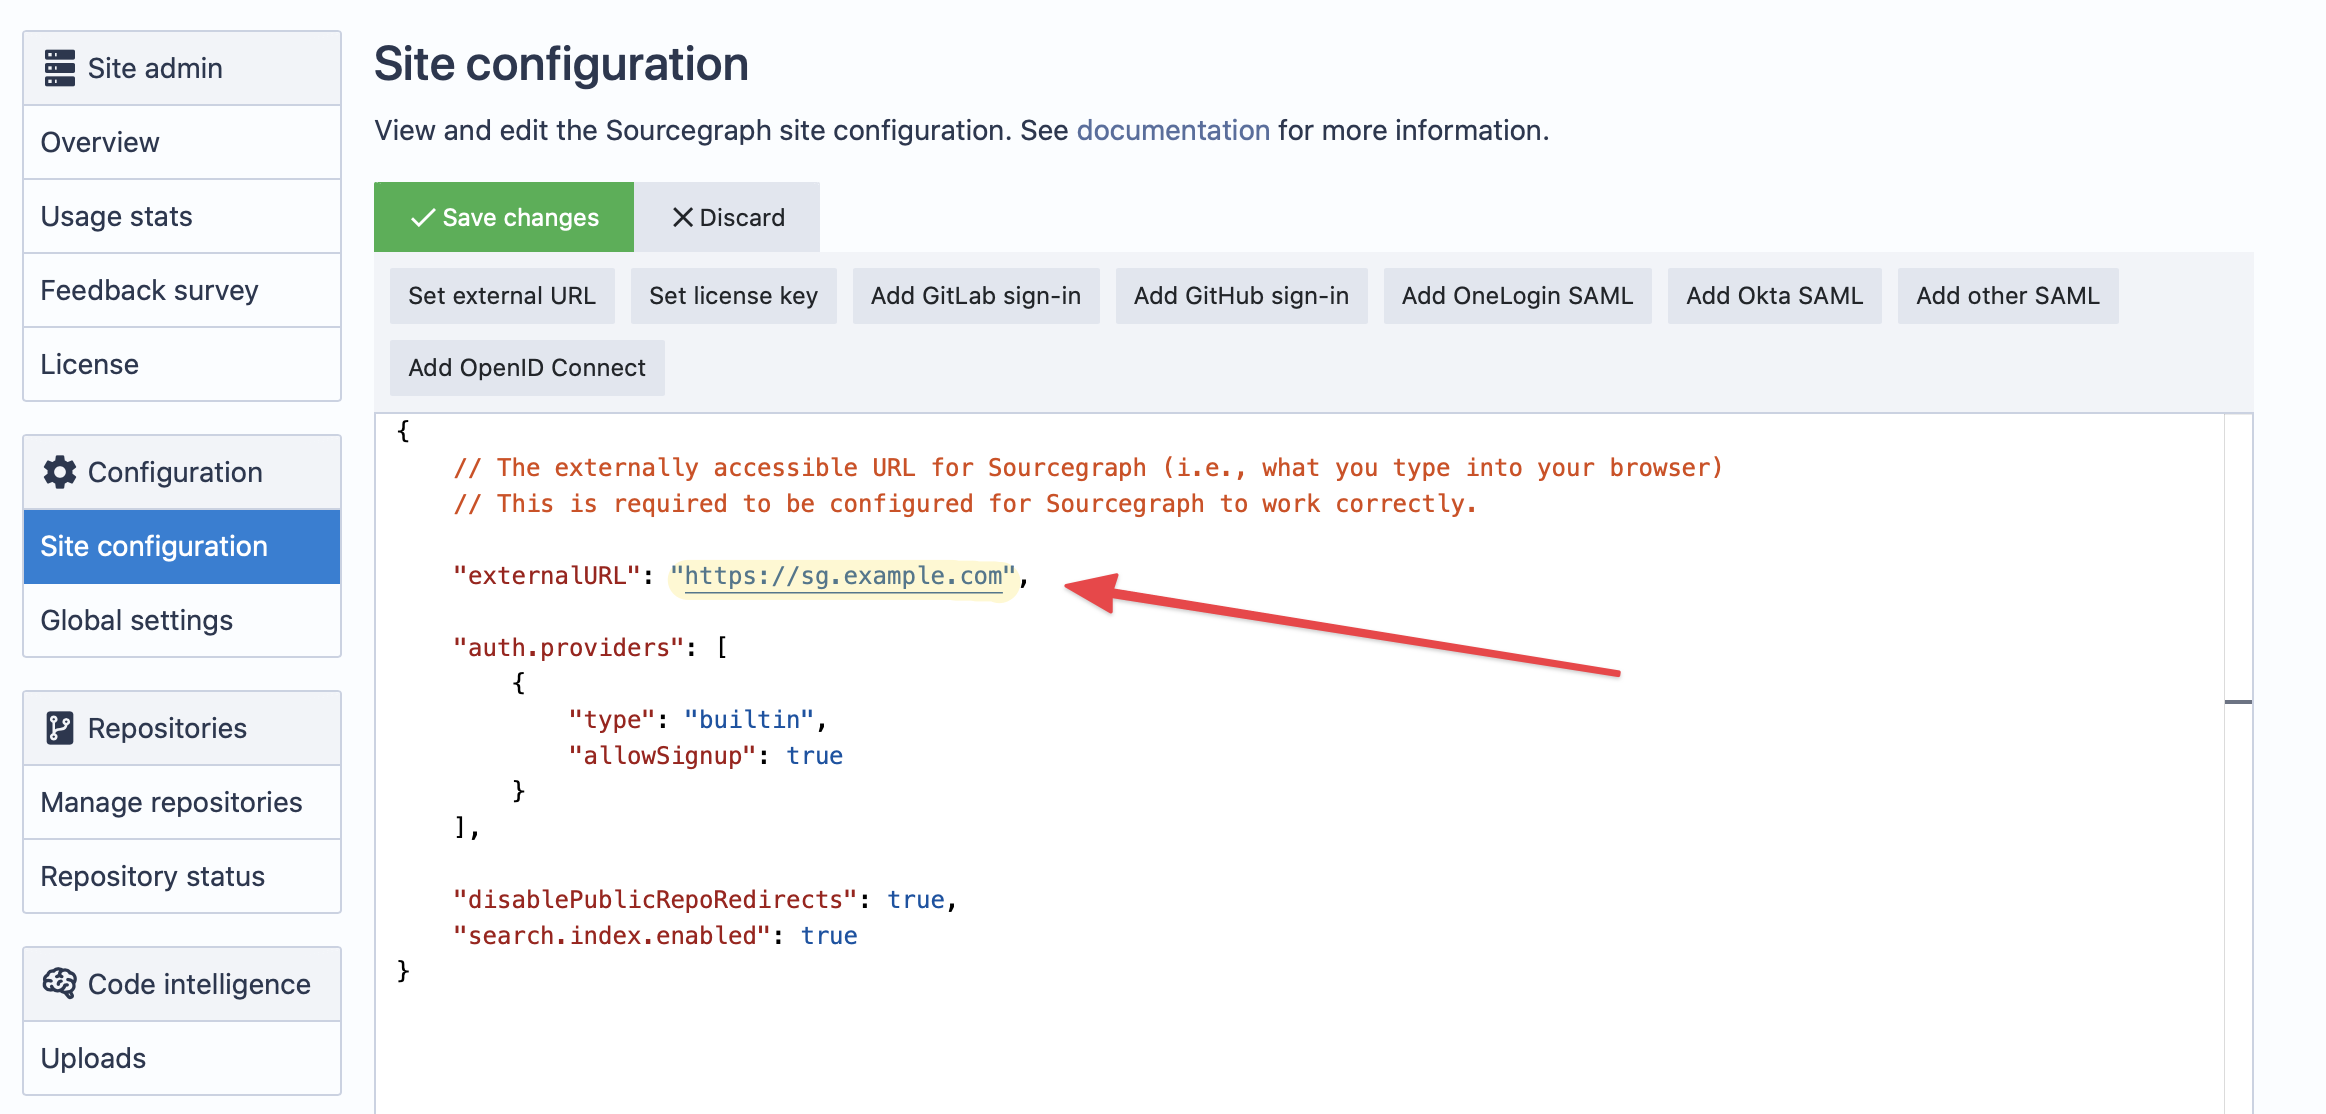
Press the green “Save Changes” button and choose “Restart Server” when prompted.
To fetch your code from GitHub, you need to get a token from GitHub. Log into your GitHub account and visit https://github.com/settings/tokens. Click “Generate new token” and follow the prompts.
You’ll only see your token once so save it somewhere safe and secure such as a password manager.
Now navigate to https://sg.ritza.co/site-admin/external-services/new and choose GitHub. Modify the configuration to:
For example, in the configuration below, we clone all public repositories from google and all public and private repositories from ritza-co (in our example, the GitHub token has access to the whole ritza-co org). We also add repositories for React and Tensorflow individually.
{
  "url": "https://github.com",
  "token": "e10db0e8307726f57254875992c24dd7ca2e2b23",
  "orgs": ["google", "ritza-co"],
  "repos": ["facebook/react", "tensorflow/tensorflow"]
}
Click the blue “Add repositories” button below the text box and wait for Sourcegraph to clone and index your repositories.
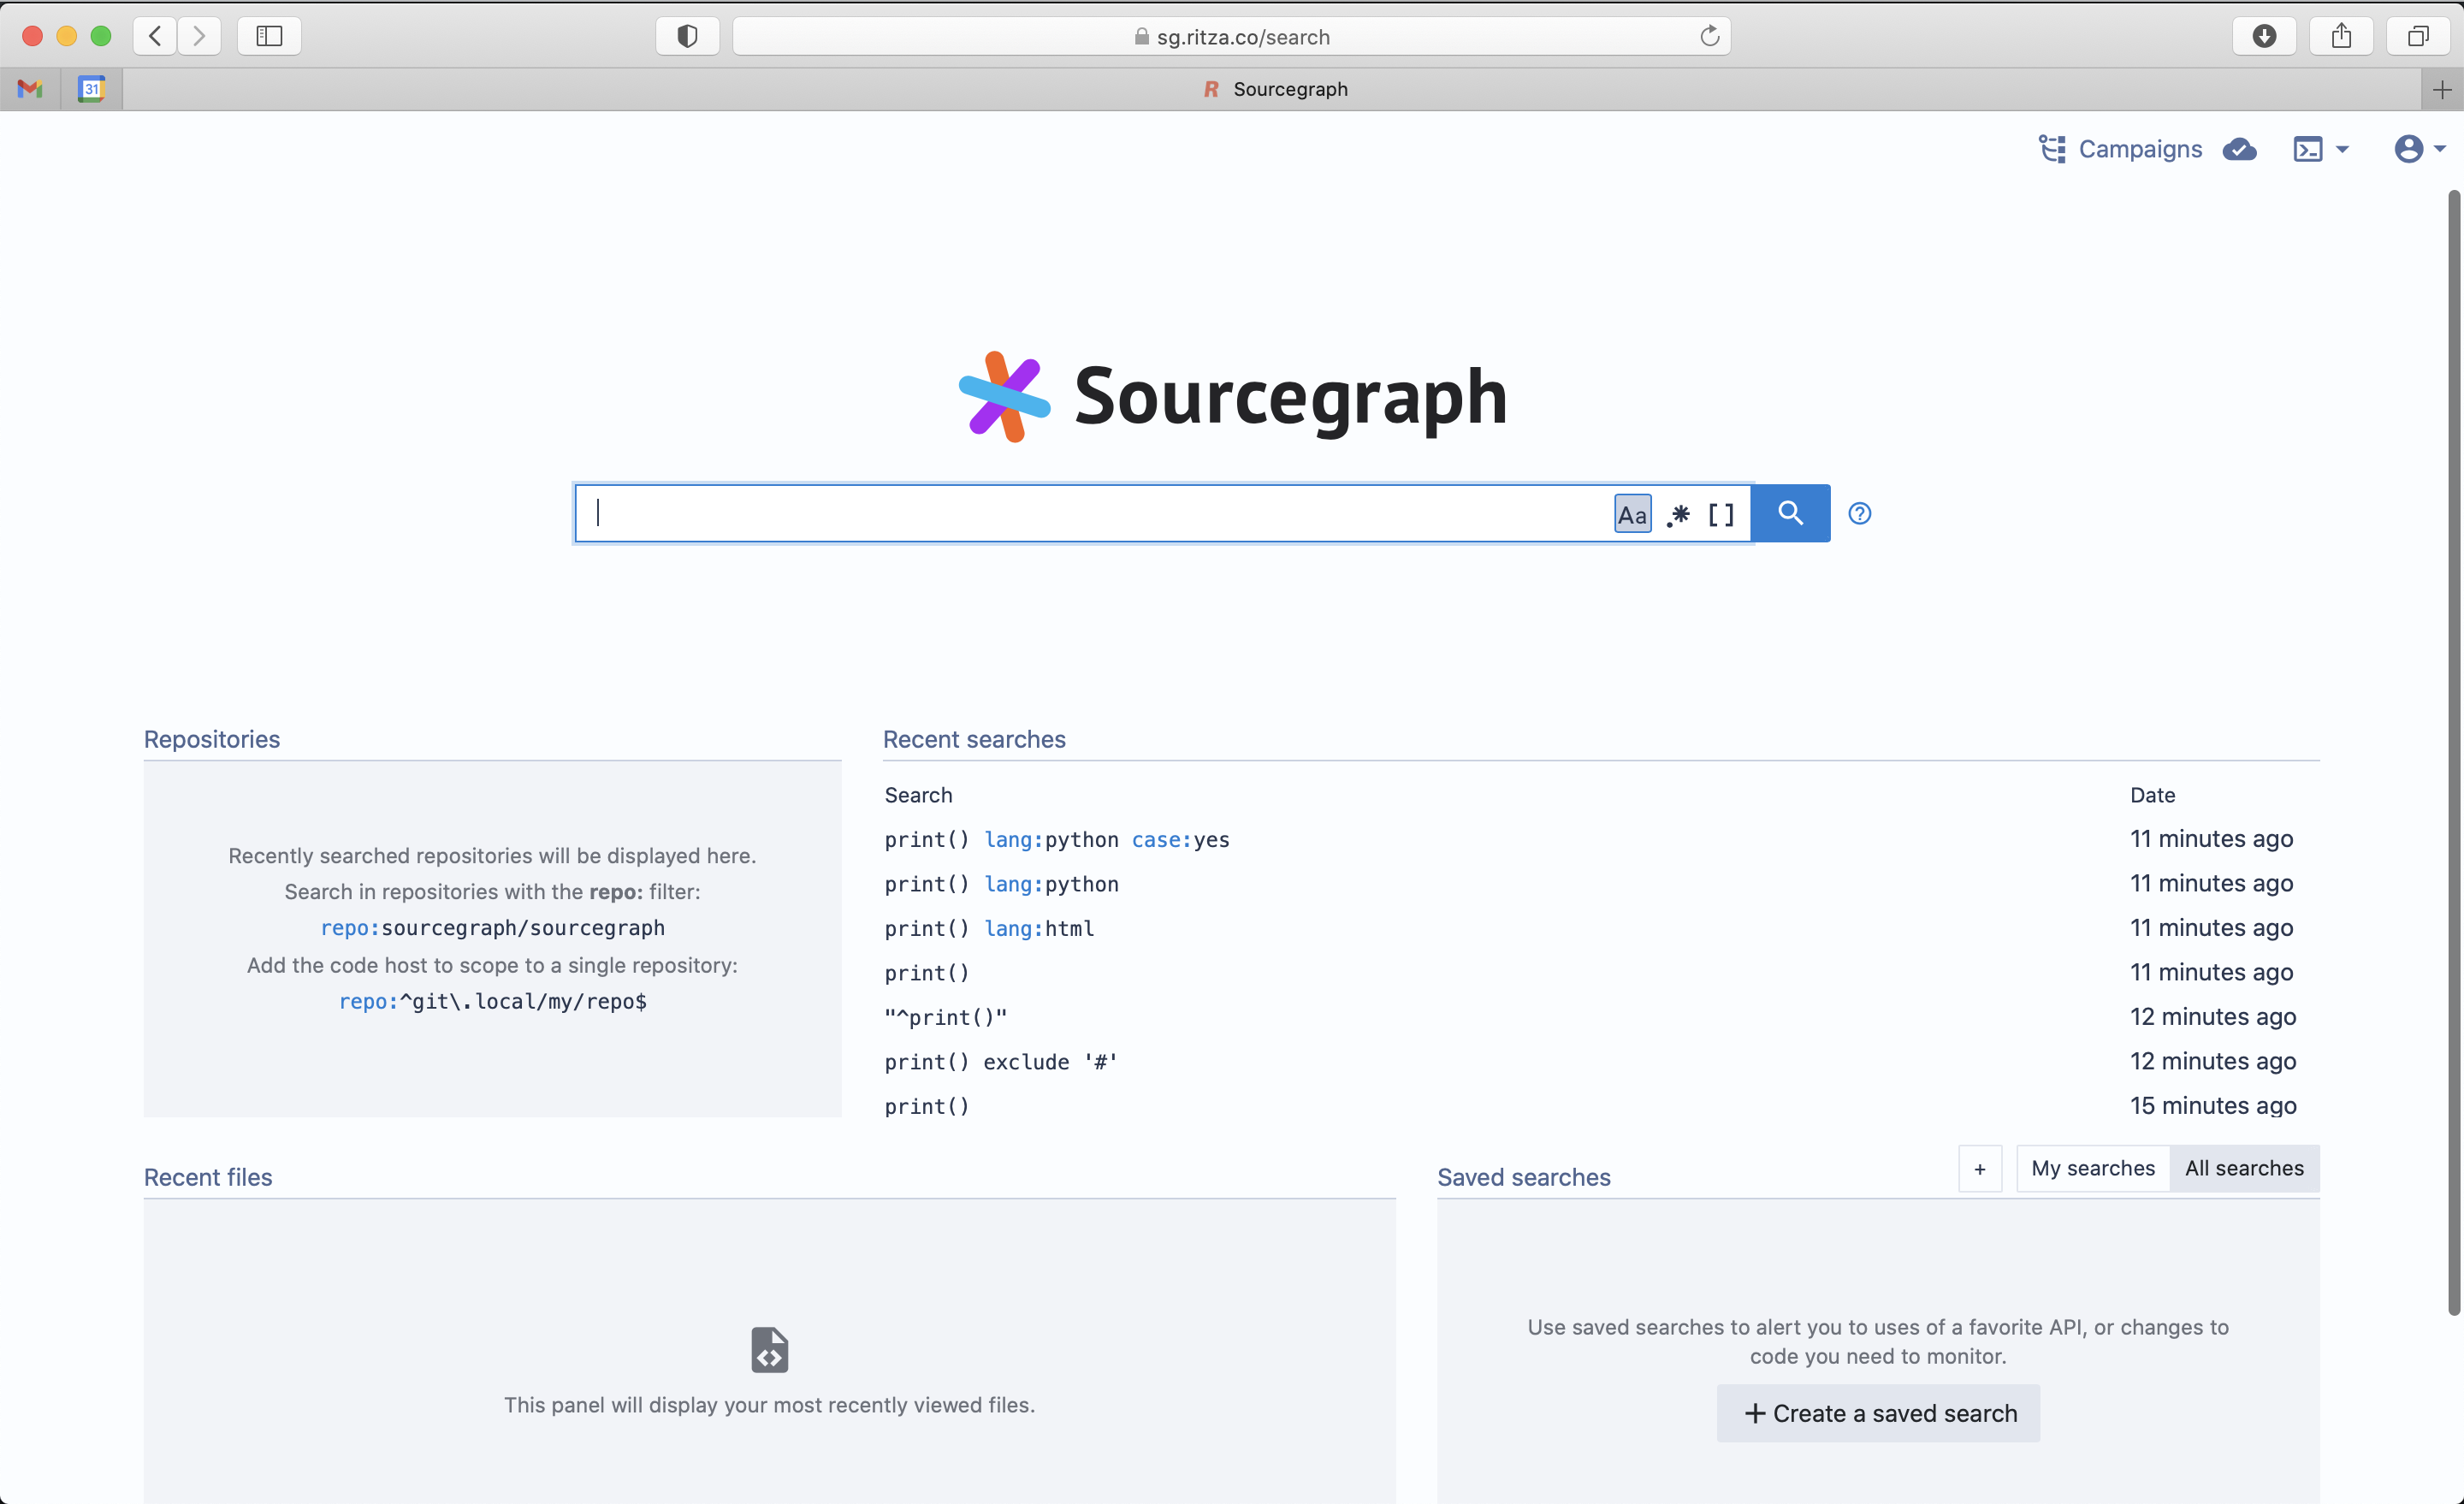
While it’s doing that, you can go ahead and try out your first Sourcegraph search (which might be incomplete while the repos are still cloning). For example, below you can see all empty print statements in Python files across all code.
Unlike GitHub search, it respects the specials characters and only returns matches including the (). It also has easy options to exclude or include forks, match case, and a lot more besides.
Take a look at https://docs.sourcegraph.com/code_search/tutorials/examples for some example searches and to start getting to know the syntax.